
reviews badges
logo
Metal-Plastic (uPVC) Entry Door Installation Guide: Step-by-Step Instructions

Installation Manual

Metal-Plastic (uPVC) Entry Door Installation Guide: Step-by-Step Instructions

Single-Slab Entry Doors · Optional Sidelites and Transoms · Multi-Point Lock · 3-Way Hinges

Shop uPVC doors
Last updated: July 2026

This guide covers installation and hardware setup for the VDOM metal-plastic (uPVC) entry door system: a multichambered, steel-reinforced PVC frame and sash, supplied pre-hung with a factory-installed multi-point locking mechanism and adjustable hinges. The system is available as a single door, or as a single door with one or two fixed sidelites and an optional transom above the unit.

BEFORE FIRST OPENING — READ THIS BEFORE ANYTHING ELSE

Do not operate, open or close the door until the cylinder and handle set are installed (Sections 5.2). Operating the multi-point lock mechanism without the handle and cylinder in place can rack the internal gearing, push the hook bolts out of position and jam the mechanism.

This door locks by LIFTING the handle, not by the key alone. Read "Operating the multi-point lock" in Section 05 before the door is used for the first time, and explain the sequence to the homeowner at handover.

01 Tools required

  • Measuring and layout - Tape measure, builder's level (spirit level), pencil
  • Drilling and fastening - Perforator for masonry openings, Ø3/8" (10 mm) drill bit, hammer, impact screwdriver / drill, hand screwdrivers (flat and Phillips)
  • Sealing and finishing - Caulking / foam gun, low-expansion mounting foam, exterior-grade sealant, utility knife
  • Setting the frame - Wooden shims, wedges and bars, load-bearing support blocks
  • Hardware adjustment - Standard screwdrivers for the 3-way hinge eccentric, side and cam screws
  • Safety - Safety glasses and gloves, step ladder, second installer for handling the slab

02 Package contents

  • Pre-hung door frame with sash (leaf) installed on adjustable hinges
  • Multi-point mortise lock mechanism, factory-installed in the sash
  • Strike plates and hook/bolt keeps, factory-installed on the frame
  • Euro-profile cylinder, 5 keys
  • Interior and exterior handle set with connecting spindle and mounting screws
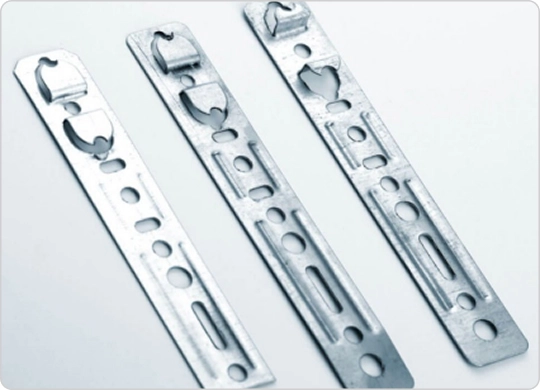
  • Mounting plates (installation brackets) — 8 pcs, with 16 fastening screws
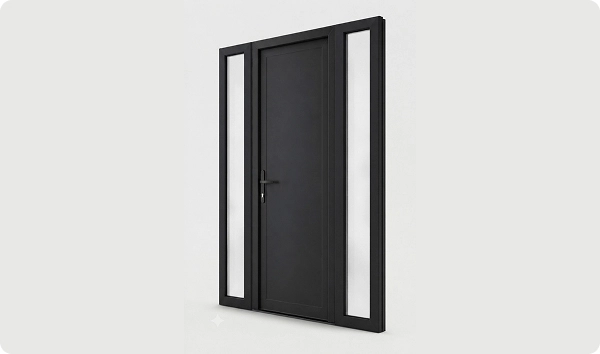
  • Sidelite frame(s) with tempered, double-glazed unit (If Included)
  • Transom frame and H-shape connecting profile (If Included)
  • Installation wedges

NOTE — SCREW COVER CAPS ARE NOT INCLUDED

Finish trim caps for frame/sidelites screws are not supplied in this kit.

Check the hardware immediately after unpacking

Carefully remove packaging, foam, plastic and cardboard, and check the door slab, frame and hardware for completeness and for cosmetic damage or deformation before the old door is dismantled. Report any shortage or damage to VDOM with the order number and photographs before installation begins.

Galvanized steel mounting plates — 8 pcs included

03 Technical information

SpecificationValue
Door Slab thickness2 3/4" (70 mm)
Frame thickness2 3/4" (70 mm)
Sidelite glazing (If Included)Tempered, double-glazed insulating unit, 1" (25 mm) thick
Hinge type3-way adjustable (vertical, horizontal, compression)
Lock typeMulti-point mortise mechanism, Euro-profile cylinder, lift-to-lock operation
Metal-plastic entry door with sidelites — reference specifications

Rough opening and sizing reference

Door dimensions are described in three different ways during ordering and installation. Confirming which figure is being used at each stage prevents the most common framing error on this product line.

  • Nominal size
    The commercial size used to order the door, for example 36" x 80". This is a catalog reference and does not describe any single physical dimension of the finished unit.
  • Unit size (with frame)
    The actual manufactured size of the complete door unit, including the outer frame. A 36" x 80" nominal door has a 38" x 82" unit size.
  • Clear (finished) opening
    The usable walk-through width remaining once the frame is installed. Because of the depth of the multi-chamber frame profile on both jambs, the clear opening is narrower than either the nominal or unit size. On a 36" x 80" nominal / 38" x 82" unit size door, the finished clear opening is approximately 32" wide.
  • Recommended rough opening
    The rough opening should be sized to the unit size plus 1/2" on each side and 1/2" on the top. This gives a 1" total clearance in width and height, which is the standard working gap for shimming and leveling. The opening may be up to 1" larger per side if wall conditions require it, but do not exceed this without verifying that the frame anchors and foam seal can bridge the gap.
Nominal sizeUnit size (as shipped)Recommended rough openingClear opening width
36" x 80"38" x 82"38 1/2" x 82 1/2" (unit + 1/2" per side)~32"
32" x 80"34" x 82"34 1/2" x 82 1/2" (unit + 1/2" per side)~28"
30" x 80"32" x 82"32 1/2" x 82 1/2" (unit + 1/2" per side)~26"

IMPORTANT — SIDELITES AND TRANSOMS DO NOT ADD CLEAR OPENING

Sidelites and transoms add to the overall unit width and height but do not add to the operable clear opening width, since they are fixed, non-operable panels. Always verify the clear opening figure against project code requirements (egress, accessibility) before ordering. The nominal size shown in the catalog is not the clear opening.

Handing and direction of opening

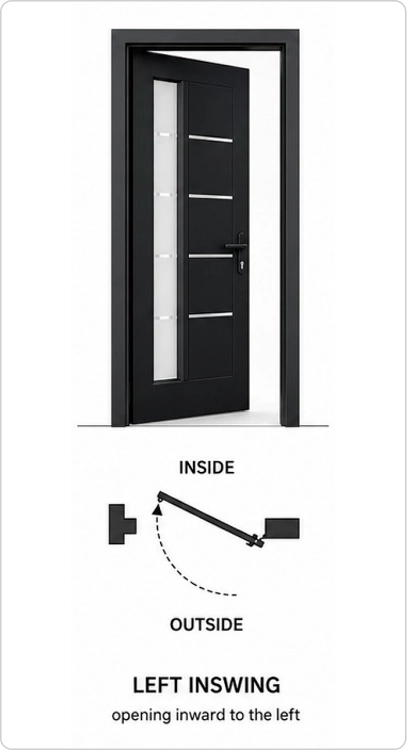
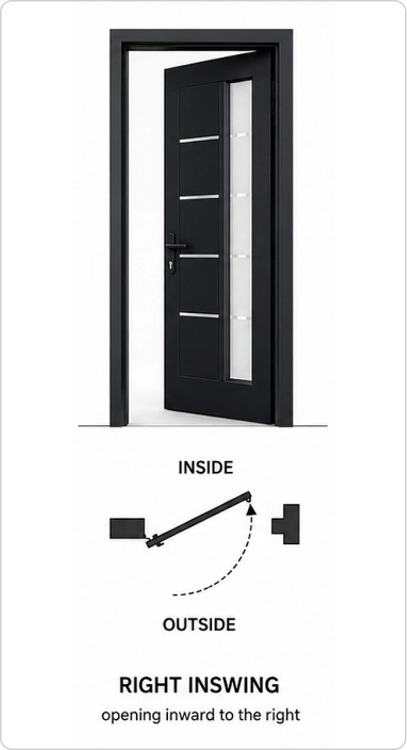
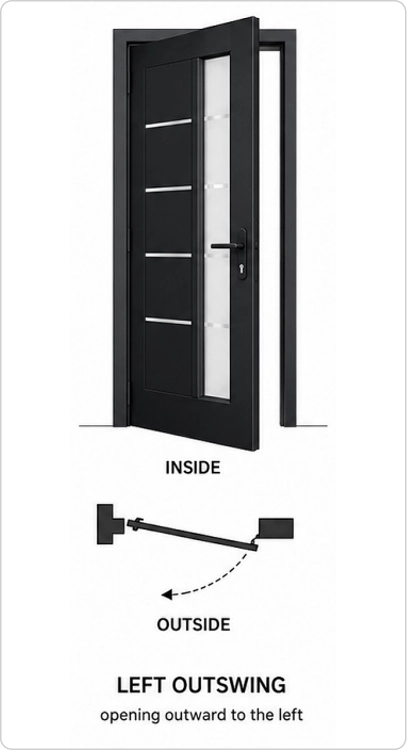
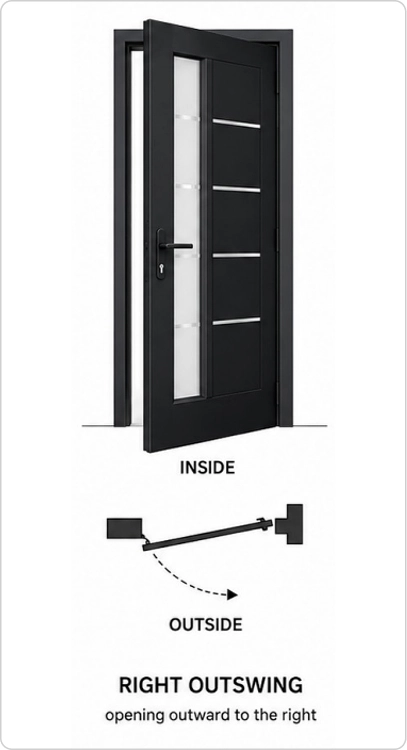
Before installation, confirm the handing and swing direction of the door match the rough opening and the project requirements. Handing is determined by the position of the hinges as viewed from the outside (exterior side). The door can be supplied in four configurations.

LEFT INSWING — opening inward to the left
RIGHT INSWING — opening inward to the right
LEFT OUTSWING — opening outward to the left
RIGHT OUTSWING — opening outward to the right

Single door handing reference — Left Inswing, Right Inswing, Left Outswing, Right Outswing.

Using a tape measure, verify the doorway size in several locations, at both width and height. The recommended rough opening around the full perimeter should be approximately 1/2" larger than the unit size on each side and at the head.

ATTENTION

Do not remove or dismantle the old door until you have confirmed the new door is the correct unit size and handing for the opening.

Canopy above the door

IMPORTANT — CANOPY REQUIREMENT

A protective canopy (overhang, awning or rain drip cap) must be installed above the door unit wherever the door is exposed to direct precipitation. PVC door systems are engineered to resist weather intrusion when properly sealed, but prolonged direct exposure of the head frame and transom to standing water or ice buildup accelerates joint seal degradation and can force water past the glazing tape and into the wall cavity.

The canopy should project at least 12" (300 mm) beyond the face of the door and cover the full width of the unit including any sidelites.

04 Step-by-step installation

Carefully remove packaging, foam, plastic and cardboard, and check the door slab and frame for completeness. Remove the transport profile before starting installation. If replacing an existing door, do not dismantle it until the new unit has been confirmed correct for size and handing.

Clean all surfaces of the doorway of dust, dirt and oil stains, and in winter conditions of snow, ice or hoarfrost, heating the surface first if needed. Repair defective areas with waterproof compounds; streaks or damage deeper than 0.4" (10 mm) are not permitted on the doorway surface. Degrease any oil-contaminated surfaces.

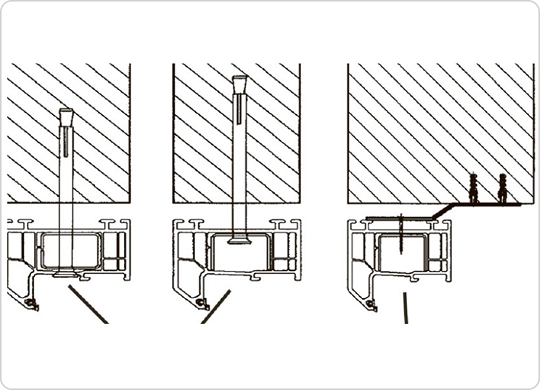
During mounting, follow the building codes, standards, and recommendations adopted in your local jurisdiction. The frame can be secured using one of the following methods, selected according to wall type and installation conditions:

  • Through-frame fixing — the frame is secured directly to the wall using anchors or dowels.
  • Extended anchors — used for deeper installations or when fastening through continued insulation.
  • Bottom anchor plates — metal plates fixed to the lower frame and secured to the floor or wall when throughframe fixing is not possible.
  • Mounting plates (installation brackets) — galvanized steel brackets clipped into the outer groove of the frame profile and screwed into the rough opening surround. Included in the package.
Frame fixing methods — dowel fixing (left, center) and bottom anchor plates (right).

A Mounting Plates — Installation Procedure

The kit includes 8 galvanized steel mounting plates and 16 fastening screws. Mounting plates are the preferred fastening method for installations where drilling through the PVC frame profile is not desired, or where the wall finish (tile, cladding) prevents through-frame access. They can also be used in combination with through-frame anchors for added rigidity.

  1. Clip each mounting plate into the perimeter groove on the outer face of the door frame profile. The plate tab hooks into the groove and locks against the frame wall.
  2. Position the plates at the following locations as a minimum: two per jamb (one near the top hinge and one near the lower hinge zone), one at the head center, and one at the sill or threshold. Use additional plates at the lockside jamb near the strike area and at mullion / sidelite frame joints.
  3. Once the frame is set level and plumb in the opening (Step 4), drive the 2 supplied fastening screws through the slotted holes of each mounting plate into the rough opening surround. Use the slotted holes for fine adjustment, then tighten fully.
  4. For sidelite frames (if included): apply the same procedure — clip a mounting plate into the outer groove of each sidelite frame at the top and bottom, and fasten into the opening surround. This prevents the sidelite from shifting or bowing after sealing.

NOTE — SUBSTRATE AND FASTENERS

Mounting plates are compatible with wood-stud, steel-stud, masonry block, and poured concrete openings when used with the appropriate fastener type for the substrate (wood screw for stud, masonry anchor for CMU/concrete). The 16 screws supplied are intended for wood-stud or wood-buck openings. For masonry substrates, substitute the supplied screws with masonry anchors of equivalent diameter.

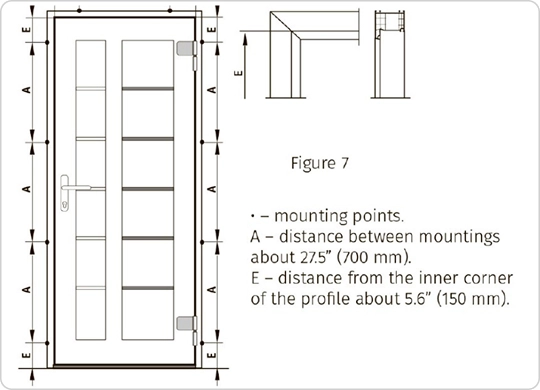
To prevent deformation of the door frame, maintain the following distances between fastening points: for doors made of PVC profiles, fasten with a pitch of no more than 27.5" (700 mm). The distance from the axis of the horizontal impost to the nearest fastening point should be approximately 5.6" (150 mm), or 9.8" (250 mm) for colored PVC profiles.

Fastening pitch — A: distance between mounting points, ~27.5" (700 mm); E: distance from the inner corner, ~5.6" (150 mm).

For exterior doors, additional fastening is required at the lock strike area and hinges due to higher dynamic loads during closing, in addition to the pressure-resistant load-bearing support block. For installations positioned in front of the wall's load-bearing structure, fastening points must also be provided at the locations of the support blocks.

Load-Bearing Support Blocks and Spacers

Load-bearing spacers must be made of a material that can withstand the loads acting on the door and transfer them to the wall structure. Load-bearing blocks are placed at the corners of the frame (under the pivot points) and in the area of the mullions and vertical imposts. Support blocks must be located 5.9"-7.9" (150-200 mm) from the inner corner line of the frame, must be at least 3.9" (100 mm) long, and must be wider than the support profile but narrower than the thickness of the door frame, so as not to interfere with the uninterrupted insulation process.

Auxiliary wedges used during installation must be removed once the frame is mechanically secured to the walls. The use of nails to attach the frame to the wall is prohibited.

Install the frame in the doorway on backing materials (wedges, bars), keeping approximately the same clearance between the frame and the doorway on both sides. Wedges are preferably installed between the frame and the wall above and below the fastening points, so as not to deform the middle part of the frame.

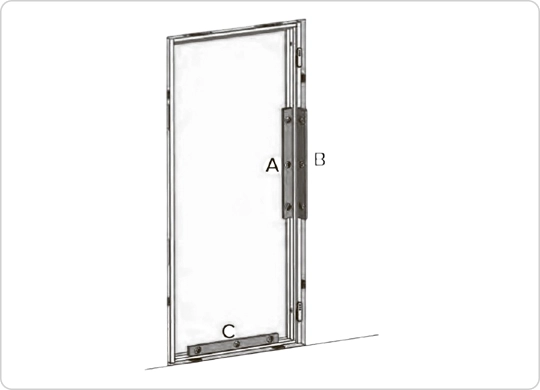
Align the door frame with a builder's level from the hinge side: apply to the inner wide shelf of the frame (A) for vertical; to the front trim of the frame (B) for inclination; to the threshold (C) for horizontal.

Alignment check — vertical (A), inclination (B), horizontal at threshold (C).

Drill a Ø3/8" (10 mm), 4.7"-5" (120-130 mm) deep hole through the upper mounting hole on the hinge side of the frame. Lubricate the anchor surface with cement-sand or adhesive mortar before installation. Install the anchor with a hammer and impact screwdriver; do not tighten fully yet. Repeat for the lower hinge-side anchor, then drive and fully tighten all remaining anchors once the frame is confirmed plumb and square.

If anchor installation through the frame is not practical, remote installation brackets may be used. These are less rigid than direct anchoring and should only be used where through-frame access is not available.

Install the door Slab and align the locking part of the frame along the contact line. Check that the clearance between the top of the Slab and the top frame profile is uniform; if not, adjust by placing wooden linings under the threshold on the side of the smaller clearance. Drill through the remaining anchor points, fasten without fully tightening, then close the door, verify alignment, and tighten all anchors. Fill the mounting clearance with low-expansion mounting foam. After installation, remove the protective film from the profile.

BEFORE FIRST OPENING

Do not operate, open, or close the door until the cylinder and handle set are installed (Section 8.2 and 8.3). Operating the multi-point lock mechanism without the handle and cylinder in place can rack the internal gearing and hook bolts out of position and jam the mechanism.

When the door unit is ordered with a transom above the frame, the transom sash is joined to the head of the door frame with an H-shape plastic connecting profile before the double-glazed unit is installed into the transom.

CRITICAL

Drainage (weep) holes in the sidelite/transom must be positioned at the bottom of the sidelite/transom frame, on the exterior side. Never seal, caulk, foam over, or otherwise obstruct these openings. They allow condensation and any moisture that reaches the glazing rebate to drain back outward; blocking them will trap water in the frame chambers.

H-shape connector fastening method

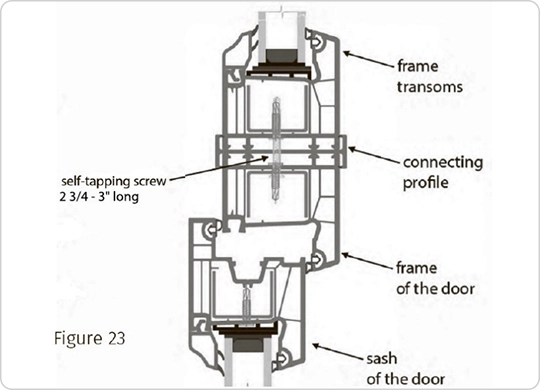
The connecting profile is inserted between the head of the door frame and the sash of the transom before the two members are joined. The connector must be aligned with the frame before it is tightened.

H-shape connecting profile joining the door frame to the transom sash
  • Drill a hole through the metal reinforcement in the frame and the door frame head where they meet the connector.
  • Drive a self-tapping screw, 2 3/4"-3" (70-76 mm) long, through the frame, through the H-shape connector, and into the transom, locking all three members together.
  • Position the first screw 4.7"-5.9" (120-150 mm) from the inside corner.
  • Space subsequent screws 11.8"-15.7" (300-400 mm) apart along the connector width.

Alternative Method: Fastening Through the Transom Frame

Where access for the connector screw is restricted, remove the sealed double-glazed unit from the transom sash first. With the glass out, drive the fasteners through the transom's own frame member from the opposite side into the connector and door frame head. Reinstall the glazing unit afterward with fresh setting blocks and sealant once the connector is fully secured.

Sealing and final assembly

  • Apply sealant or sealing tape to the frame joints before joining the members.
  • Check the operability of the door before final sealing.
  • Insert the double-glazed unit into the transom only after the connector is fully tightened.
  • Seal the full perimeter with low-expansion foam or sealant, keeping the exterior weep holes clear.

05 Hardware installation

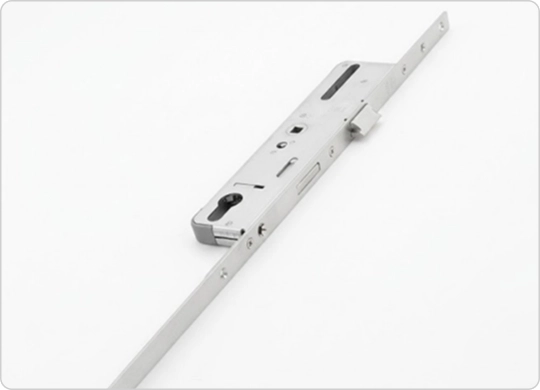
The multi-point mortise lock is factory-installed in the door sash. It consists of a main latch bolt and multiple deadbolt extensions (hooks or pins) that engage into keeper plates on the frame side, which are also factory-installed. The multi-point configuration provides increased weather-sealing performance by drawing the sash evenly against the frame compression seal.

Multi-point mortise lock mechanism.
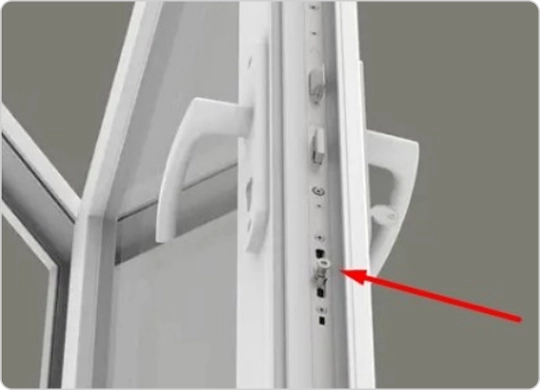
Multi-point strip engagement zone on the sash edge.

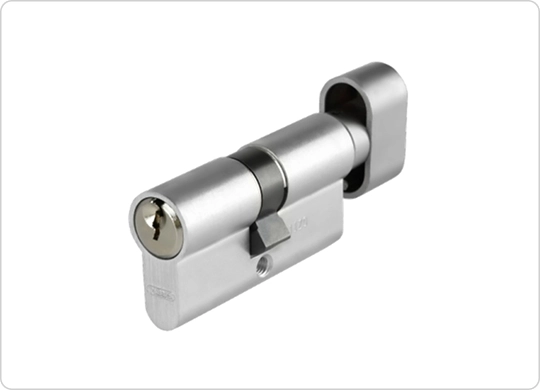
The Euro-profile cylinder locks the multi-point mechanism from the exterior. The cylinder is threaded through the sash from the exterior face and secured by a single set screw through the edge of the sash into the cylinder cam clamp.

  • Confirm the cylinder is a key-and-knob (K+T) type: key on the exterior side, thumbturn on the interior.
  • Insert the cylinder into the cam slot in the mortise lock body from the exterior side with the cam pointing toward the interior.
  • Align the cylinder fastening hole with the lock body clamp hole.
  • Tighten the cylinder set screw with a hand screwdriver only. Do not overtighten.
Euro-profile key-and-knob cylinder — key side (exterior) and thumbturn (interior).

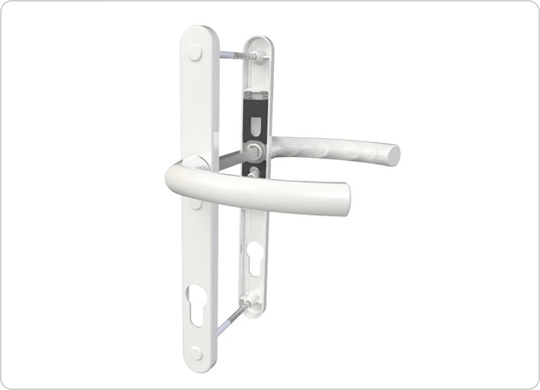
The door uses a European-pattern lever handle with a two-bolt long backplate. The square spindle connecting the interior and exterior levers transfers handle rotation to the latch bolt retractor and to the multi-point gearing.

Handle assembly — spindle, backplate, lever, and mounting screws.
  • Insert the square spindle of the handle set into the hub opening in the lock case from the interior side.
  • Mount the interior handle onto the spindle close to the door Slab face.
  • Trim (shorten) the spindle bolts if needed to match the sash thickness.
  • Position the exterior handle over the spindle and align both backplates.
  • Tighten both handle backplates through the mounting holes in the Slab using the tightening screws supplied.
  • Fit the plug caps over all visible screw heads.

NOTE

Screw cover caps are not included in the standard kit. Order finish-matched cover caps for the handle backplate screws, hinge screw heads and frame anchor heads if a fully concealed-fastener finish is required.

This door locks by lifting the handle, not by the key alone. Read "Operating the multi-point lock" below before operating the door for the first time.

This door uses a lift-to-lock (lift-lever) multi-point mechanism. The hook bolts and pins are driven out by the handle, not by the key. The key only deadlocks the mechanism once the bolts are extended, so the door will not lock by key alone.

To lock the door

  • Close the door fully so the sash sits flat against the frame seal.
  • Lift the handle upward as far as it will go. This drives the hook bolts and pins out of the sash edge into the keeps on the frame, and draws the sash evenly against the compression seal.
  • Turn the key one full turn to deadlock the mechanism, then remove the key.

To unlock the door

  • Turn the key in the opposite direction to release the deadlock.
  • Press the handle down. This retracts the hook bolts and the latch, and the door opens.

From the interior side the sequence is the same, using the thumbturn in place of the key.

IMPORTANT

The handle must be lifted before the key will turn. If the key will not turn, the handle has not been lifted to its stop.

Never lift the handle while the door is open and then close it. The extended hook bolts will strike the frame and can damage the bolts, the keeps and the frame profile.

Never force the handle if it meets resistance on the way up. Resistance means the sash is out of plane and the hooks are not meeting the keeps. Check the hinge adjustment below before operating the lock again.

Explain the lift-to-lock sequence to the end user at handover. Customers who are not familiar with European multi-point hardware often report the door as faulty when the key will not turn, when in fact the handle was never lifted.

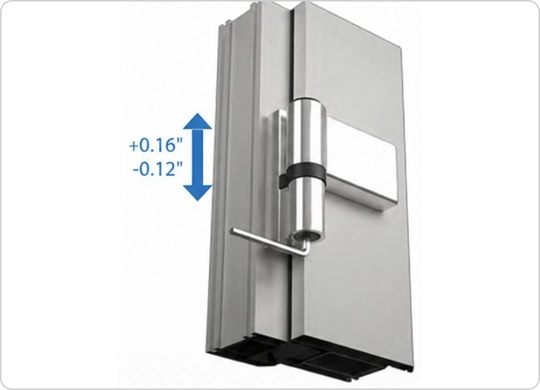
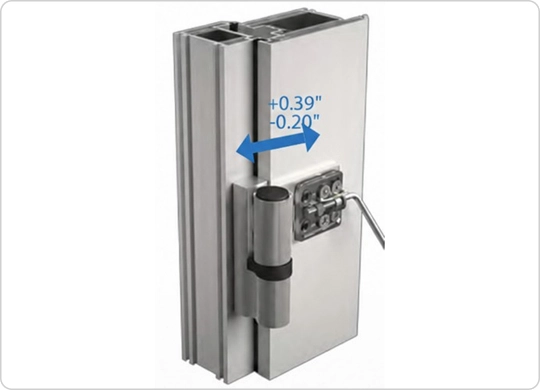
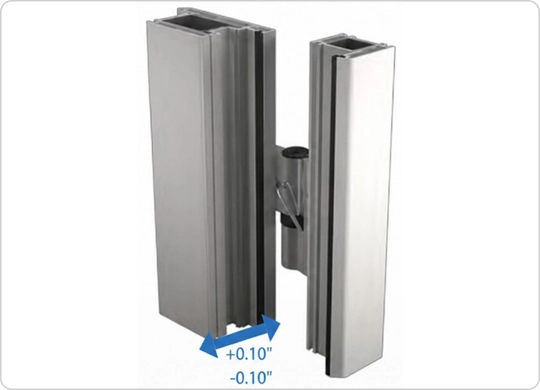
The door is equipped with 3-way adjustable hinges that allow the sash position to be corrected in the field without removing the door from the frame. All adjustments can be made with the door installed, using standard screwdrivers.

Vertical adjustment
Vertical adjustment
Horizontal adjustment
Compression adjustment
Adjustment TypeRangeHow to Adjust
Vertical (up/down)+0.16" / -0.12" (+4 mm / -3 mm)Loosen top and bottom hinge eccentric screws; raise or lower the sash, then retighten.
Horizontal (in/out of frame plane)+0.39" / -0.20" (+10 mm / -5 mm)Loosen the hinge side adjustment screw; move the sash in or out, then retighten.
Compression (sash depth vs. frame face)+0.10" / -0.10" (+2.5 mm / -2.5 mm)Turn the cam screw on the hinge body clockwise to push the sash deeper into the frame seal.

To correct diagonal racking (one corner higher on one side), adjust the top and bottom hinges in opposite vertical directions in small equal increments until the gap at the top of the sash is uniform from hinge side to lock side. Adjust one hinge at a time and check after each half-turn.

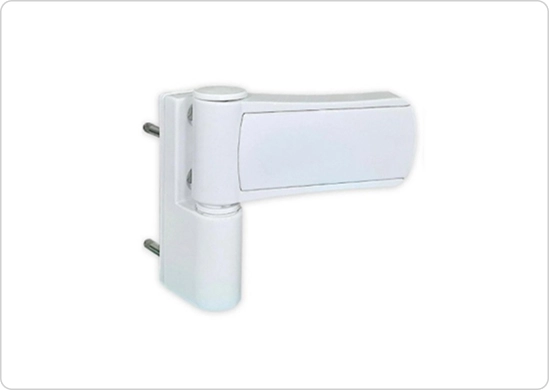
3-way adjustable hinge

06 Optional add-ons

Interior and exterior trim profiles are available to cover the gap between the door frame and the rough opening finish. Trims clip into the outer groove of the PVC frame profile or are secured with a continuous bead of MS-polymer or polyurethane adhesive along the full contact length. Do not use spot dabs — continuous contact is required to prevent the trim from bowing. Finish nails may be used as supplementary fasteners on uneven surfaces.

NOTE:

Trim and casing profiles are ordered separately and are not included in the standard package.

Frame extensions are available to accommodate walls thicker than the standard frame depth. Rip the extension to the required wall thickness by trimming the flat face only.

The VDOM Smart Lock is the only lock actuator certified for use with this door system. It is specifically engineered to work with the factory-installed multi-point mechanism and Euro-profile cylinder mortise on VDOM doors. The actuator replaces the thumbturn (interior knob).

COMPATIBILITY NOTE

Only the VDOM Smart Lock is recommended for this door system. Third-party smart lock actuators are not tested for compatibility with the VDOM multi-point mechanism and cannot be recommended. Installation of an incompatible actuator may interfere with the multi-point bolt travel, void the door warranty, or compromise weather seal performance. Contact VDOM for the smart lock option for your door configuration.

07 Installation errors

The most common mistakes on this product

  • Framing to the nominal size instead of the unit size, or promising the customer a clear opening equal to the nominal size.
  • Dismantling the old door before the new unit has been checked for size, handing and damage.
  • Operating the handle before the cylinder and handle set are installed, which racks the multi-point gearing.
  • Lifting the handle with the door open and then closing it, so the extended hook bolts strike the frame.
  • Handing the door over to the customer without explaining the lift-to-lock sequence.
  • Exceeding a 27.5" (700 mm) fastening pitch , or omitting the extra fixings at the hinges and strike area.
  • Using nails to fix the frame to the wall , or leaving the auxiliary wedges in place after anchoring.
  • Foaming over or caulking the sidelite and transom weep holes.
  • Leaving the protective film on the profiles — in direct sunlight it bonds to the surface and causes permanent discoloration.
  • Installing the unit with no canopy above a fully exposed entrance.
SymptomLikely causeCorrective action
Key will not turn in the cylinder; door will not deadlockHandle not lifted, so the hook bolts are still retractedClose the door, lift the handle fully upward to extend the bolts, then turn the key
Door feels loose or draughty when lockedHandle lifted only part way, so the bolts are not fully seated in the keepsLift the handle to its stop before turning the key. If the handle will not reach the stop, check sash alignment and hinge compression
Handle will not lift, or lifts only part waySash out of plane; hook bolts fouling the keeps rather than entering themDo not force the handle. Check all three hinge adjustments and confirm the keeps are aligned with the bolts
Sash drags on the frame on the lock side when closingVertical hinge misalignmentAdjust the vertical hinge to raise the lock-side corner
Uneven gap at top of sashFrame not plumb, or diagonal hinge deflectionRe-check frame plumb. Adjust top and bottom hinges in opposite vertical directions
Handle is stiff or hard to lift to the locked positionLocking strip too tight, or sash pressing too hard against the frameLoosen hinge compression. Adjust the locking strip eccentric to reduce clamping force
Draft or cold air at sash perimeterCompression seal not engaged uniformlyIncrease hinge compression. Check the seal for damage or gaps
Multi-point mechanism will not engage / handle jamsSash out of plane; hook bolts not aligned with keepsCheck all three hinge adjustments. Ensure the cylinder is installed and engaged
Lock cylinder hard to turn with keySet screw overtightened, or cylinder misaligned with the camLoosen and re-seat the cylinder. Re-tighten the set screw with a hand screwdriver only
Transom leaking water at bottomDrainage holes blocked or transom bottom seal damagedClear all drainage holes. Replace the bottom seal if damaged
Sidelite shows condensation between glass panesInsulating unit seal failure (fogging)The sealed unit requires replacement. Contact VDOM at sales@vdom.us

Care guide

Finishing notes

  • Screw cover caps for all exposed fastener heads (handle backplate, hinge screws, frame anchor heads) must be ordered separately. Caps are not included in the standard kit.
  • After the foam cures, trim it flush with the frame face and cover it with sealant or a trim profile.
  • Remove the protective transport film from all PVC profile surfaces immediately after installation. Film left on profiles in direct sunlight will bond to the surface and cause permanent discoloration.
  • Check all sash-to-frame clearances after the first 2–4 weeks of operation and re-adjust the hinges if settling has occurred.

Lubrication (every 6–12 months)

  • Apply a thin film of silicone-based grease or dry PTFE lubricant to all hinge pivot points, the lock latch and bolt travel faces, and the multi-point mechanism rod guides.
  • Do not use petroleum-based or WD-40-type penetrating oils on PVC hardware — they degrade the rubber seals and plastic components over time.

Cleaning

  • Clean PVC frame and sash profiles with warm water and a mild detergent.
  • Avoid abrasive pads, solvent-based cleaners, acetone, bleach or any product carrying hazard symbols. These will permanently damage powder-coated and PVC surfaces.

Seal inspection

  • Inspect the perimeter compression seal annually for cracks, gaps or permanent compression set.
  • Replacement seal profiles are available by door size. Replace the full perimeter seal as a single piece; do not patch-repair sections.
  • Keep the sidelite and transom weep holes clear at every inspection.

Exterior door care guide

How to keep your VDOM entry door looking its best

Your VDOM entry door is built to perform in all four seasons. This guide shows you exactly how to clean and maintain it — by door type and finish — so it keeps looking showroom-new for years with minimal effort.

01 The Basics — for every VDOM entry door

Whether you have a uPVC or an aluminum door, these three habits will cover most of your maintenance. Everything else in this guide builds on them.

Outdoor doors collect pollen, road dust, insect residue, and exhaust soot faster than anything inside the house. A quick monthly clean keeps this from building into grime that needs serious scrubbing later.

  • Rinse first. Use a garden hose on low pressure to knock off loose dust and pollen. Never use a pressure washer — even on the 'low' setting it can force water past door seals and glazing tape.
  • Wash with mild soap. Mix 3-4 drops of dish soap in a bucket of warm water. Wipe with a soft microfiber cloth or non-abrasive sponge, working top to bottom.
  • Rinse off the soap. Soap residue left to dry becomes a dull film that attracts more dirt. Rinse with clean water.
  • Wipe dry. A dry microfiber cloth removes water spots and leaves the surface looking clean. On glass inserts, buff dry before the water air-dries — standing water leaves mineral deposits.

Never use these on any VDOM entry door

  • Pressure washer or steam cleaner — forces water past seals.
  • Bleach, ammonia, or chlorine-based products (Pine-Sol, Clorox wipes, standard Windex).
  • All-purpose household sprays (Lysol, 409, Fantastik) — many contain solvents.
  • Abrasive pads, steel wool, or stiff-bristle scrub brushes.
  • Acetone, nail polish remover, or paint thinner.
  • Silicone furniture polish (Pledge) — fogs the surface and attracts dust

Install a canopy or overhang — this is the single most effective thing you can do for your door

A canopy projecting at least 12 inches (30 cm) beyond the door face keeps rain, snow, and direct sun off the door surface. Without one, every rain event drives water into seals and joints, and summer sun bakes finishes from the outside.

Direct afternoon sun on a dark-color door raises the surface temperature well above what any manufacturer rates their finishes for. A canopy eliminates this.

If your installation does not have a canopy, discuss adding one with your contractor. It extends the life of every component — door, frame, glass seals, hardware, and threshold — by years.

  • Lock mechanism: apply a small amount of graphite powder or PTFE dry lubricant to the keyway and bolt faces once a year. Never use WD-40 inside a lock — it attracts grit and thickens into a paste over time.
  • Hinges: apply a drop of machine oil or PTFE spray to each hinge pivot annually. A stiff hinge puts stress on the door panel and frame at the hinge zone.
  • Handle and hardware: wipe with a dry or barely-damp cloth. Apply a thin coat of automotive paste wax to hardware faces twice a year — this slows tarnishing and salt deposit buildup, especially in coastal locations.
  • Weatherstripping: inspect the perimeter seal each fall. A seal that is cracked, compressed flat, or torn allows drafts, water, and insects in. Replacement seals are available from VDOM by door model.

02 uPVC (Metal-Plastic) entry doors

VDOM uPVC doors use a multi-chamber steel-reinforced PVC profile as both the structural frame and the visible door surface. The profile is co-extruded or laminated with a decorative layer. Because the entire visible face is PVC, care is straightforward and the same across all colors, with one important color-specific note.

PVC PROFILE — WHAT YOU NEED TO KNOW

The color is either integral to the PVC compound (standard white and light colors) or applied as a factory laminate bonded under heat (dark colors: black, anthracite, dark gray, and specialty shades).

Integral-color PVC is highly resistant to cleaning agents and UV. It can be cleaned with mild soap and water without any concern about the color layer.

Laminated dark-color profiles have the same non-porous PVC face but an additional adhesive layer at edges and joints — this layer is heat-sensitive. Treat them with slightly more care in terms of heat exposure (direct afternoon sun, anything placed against the door surface).

All colors are UV-stabilized, but very dark colors absorb significantly more heat. A black or anthracite door in direct afternoon sun can reach surface temperatures that are hard to touch with a bare hand.

  • Monthly routine: follow Section 1.1. uPVC is one of the easiest exterior surfaces to clean — most outdoor grime comes off with soap and water and a soft cloth.
  • Scuffs and marks: a melamine foam eraser (Mr. Clean Magic Eraser) used lightly on the PVC surface removes most stubborn marks including rubber scuffs and hard water deposits. Use minimal pressure — test in a corner first on dark laminated surfaces.
  • Sap, adhesive, or sticker residue: apply a small amount of vegetable oil or baby oil to the area, leave for 2-3 minutes, then wipe off with a warm soapy cloth. Rinse clean.
  • Chalky or dull white surface (oxidation): standard white PVC that has oxidized over many years can be restored with a dedicated uPVC cleaner or a small amount of white automotive polish applied with a soft cloth, then buffed off. This is a once-every-few-years task, not routine.
  • Textured surface channels: use a soft-bristle brush with the soapy water solution to work grime out of texture grooves. Rinse and dry — soap left in channels dries as white residue.
  • White and Light Colors
    The easiest to maintain. Occasional discoloration from iron deposits (rust streaks from nails or fasteners nearby) can be removed with a diluted white vinegar solution — 50/50 with water — applied with a cloth and rinsed off. Do not let vinegar sit for more than 2-3 minutes.
  • Black, Anthracite, and Dark Colors (Laminated)
    Dark profiles show fingerprints and water spots more visibly than light colors. After the monthly wash, a dry microfiber buff removes remaining water marks. Inspect the profile edges and corner joints each spring — the laminate can begin to lift at these points on south-facing installations with high sun exposure. If an edge starts to lift, press it back and run a fine bead of clear UV-stable silicone along the edge immediately.

Dark-color uPVC in direct sun — what to watch

Very dark colors (RAL 9005 Black, RAL 7016 Anthracite) absorb substantially more heat than white or light colors. On a south-facing installation without a canopy, peak summer surface temperatures on a dark door can be high enough to soften laminate edge adhesive.

If your dark door is south- or west-facing, a canopy is even more important than for light-color doors.

Never place anything against a dark uPVC surface in direct sun — furniture, cardboard, mats, packages. These trap heat and can leave marks or cause localized laminate softening.

  • Gray (All Shades)
    Mid-tone grays behave similarly to light colors in terms of heat absorption. Standard cleaning applies. On textured gray profiles, light discoloration in the texture grooves is typically grime, not damage — a soft brush with soapy water removes it easily.

The joint between glass and PVC frame — the most important rule

  • Never spray water or cleaning solution directly at the door. Always apply to the cloth first, then wipe.
  • Never let liquid run into the joint where the glass meets the PVC frame. The glazing tape and sealant at this joint is what keeps weather out — forcing water into it under pressure or by pooling breaks down the seal over time.
  • When wiping the glass, work from the center outward and stop before the frame edge. Wipe the frame separately.
  • After cleaning, check the glass perimeter for any gaps in the sealant. Re-seal any gaps with a clear, neutral-cure silicone sealant rated for glazing.
  • Clear and frosted glass: ammonia-free glass cleaner on a microfiber cloth, straight strokes, buff dry. Ammonia-free Windex or 50/50 distilled water and white vinegar both work well.
  • Decorative or tinted glass: plain water on a soft cloth, then dry. Avoid vinegar on tinted coatings.
  • Hard water deposits: 50/50 white vinegar and distilled water on a cloth, left on for 60 seconds, wiped and immediately dried.

✓ Do

  • Monthly wash: dish soap, soft cloth, rinse, dry
  • Magic Eraser (lightly) for stubborn marks and scuffs
  • Vegetable oil for sap and adhesive residue
  • Diluted white vinegar for rust streaks on white PVC
  • Soft brush for textured surface channels
  • Inspect dark-color laminate edges each spring
  • Apply glass cleaner to cloth only — never spray at door
  • Clear silicone to re-seal any glass perimeter gaps

✕ Do not

  • Use pressure washer — even low pressure damages seals
  • Use bleach, ammonia, or chlorine cleaners
  • Use acetone or solvent cleaners on any surface
  • Leave dark-color door in direct sun without a canopy
  • Let liquid run into the glass-to-frame joint
  • Use abrasive pads or stiff brushes on PVC or glass
  • Apply silicone polish (Pledge) — fogs the surface
  • Pull lifting laminate edges — press back and seal instead

03 Aluminum entry doors

VDOM aluminum entry doors combine an aluminum structural frame with a door panel that may be finished in one of three ways: powder coat, sublimation (laminated metal), or a wood veneer / moisture-resistant MDF face. Each has different care requirements. Check your order confirmation or the door edge label to confirm which finish your door has.

How to identify your aluminum door finish

Powder coat: uniform solid color, slightly textured to the touch, matte or satin sheen. The surface feels like the outside of a quality appliance.

Sublimation / laminated metal: a realistic wood-grain, stone, or decorative print that looks like real texture but is smooth to the touch. Very consistent pattern across the panel.

Wood veneer: visible natural wood grain that changes slightly across the panel. Warm to the touch. Edges may show the veneer thickness.

Moisture-resistant MDF with foil or film: similar appearance to eco-veneer interior doors — smooth, slightly flexible surface over a rigid MDF core.

Powder coat is a dry paint applied electrostatically and cured under heat directly onto the aluminum frame and panel. The result is a hard, uniform, weather-resistant film — one of the most durable exterior finishes available. It resists UV fading, handles temperature extremes well, and cleans easily.

  • Routine monthly wash: follow Section 1.1. Powder coat is the most forgiving aluminum finish to clean. Most outdoor grime releases with soap and water.
  • Pollen and road film: these build up as a hazy layer on horizontal surfaces (top of door, window sills). The monthly rinse and wipe handles this without scrubbing.
  • Grease and fingerprints: diluted dish soap on a cloth removes these easily. Powder coat does not absorb oils.
  • Scuffs from tools, keys, or packages: light surface scuffs on powder coat can sometimes be reduced by rubbing gently with a small amount of automotive paste wax (e.g., Turtle Wax or Meguiar's) on a soft cloth. This fills micro-scratches slightly and restores gloss.
  • Mildew in recesses or along frame joints: diluted white vinegar (50/50 with water) on a cloth, scrubbed gently with a soft brush, then rinsed. For heavy mildew, diluted oxygen bleach (OxiClean mixed to label strength) — test in a hidden area first, rinse completely.

Powder coat — the one thing that damages it

Deep scratches and chips that go through to bare aluminum. These must be touched up promptly to prevent the aluminum from oxidizing (turning chalky white) under the coating.

Touch-up: clean and dry the area, apply a matching powder coat touch-up pen or brush-on liquid. Apply in thin coats. This is a cosmetic repair — it will not be invisible, but it stops further oxidation.

Caustic (strongly alkaline or strongly acidic) cleaners strip powder coat permanently. Avoid any cleaning product that is not labeled pH-neutral or 'safe for painted aluminum'.

✓ Do

  • Monthly wash: dish soap, microfiber cloth, rinse, dry
  • Automotive paste wax to reduce light surface scuffs
  • White vinegar solution for mildew in frame joints
  • Touch up chips promptly with matching touch-up pen
  • Apply glass cleaner to cloth — never spray at door
  • Automotive paste wax on hardware twice a year

✕ Do not

  • Use pressure washer or steam cleaner
  • Use caustic or strongly alkaline cleaners
  • Let chips or scratches sit unaddressed — oxidation follows
  • Use abrasive pads or steel wool
  • Use ammonia-based cleaners near glass or hardware
  • Use acetone or paint thinner near any surface

Sublimation and laminated metal finishes apply a decorative print — typically realistic wood grain, concrete, stone, or solid color — directly to an aluminum panel through a heat-transfer or bonding process. The surface is completely smooth to the touch while looking highly textured, and the colors are UV-stabilized for outdoor use. This is a low-maintenance, high-appearance finish.

  • Routine monthly wash: follow Section 1.1. The non-porous metallic surface releases grime very easily. Most marks come off with plain soapy water and a soft cloth.
  • Fingerprints: very visible on dark or gloss-finish sublimation panels. A dry microfiber cloth buffing pass after the wash removes them.
  • Hard water or mineral deposits: 50/50 white vinegar and distilled water on a cloth, wiped on, left 30 seconds, wiped off, buffed dry. Do not let vinegar sit more than a minute.
  • Stubborn marks: a small amount of isopropyl alcohol (70%) on a cloth, blotted on the mark, then wiped clean and dried. Test in a hidden spot first.

Sublimation / laminated finish — keep these away

  • Abrasive cleaners, scouring pads, or steel wool — the decorative print is a surface layer and scratches are immediately visible and permanent.
  • Solvents (acetone, paint thinner, nail polish remover) — attack the print layer.
  • Sharp objects placed or dragged against the surface — e.g., ladder feet, tools rested against the door. Always pad contact points.
  • Never use a squeegee with a metal or hard plastic edge on this finish.

✓ Do

  • Monthly wash: soap, soft microfiber, rinse, buff dry
  • Dry microfiber buff after washing removes fingerprints
  • White vinegar (50/50) for mineral deposits — max 1 min
  • 70% isopropyl on cloth for stubborn marks (test first)
  • Apply glass cleaner to cloth only — never spray at door
  • Pad any ladder feet or tools that contact the door

✕ Do not

  • Use abrasive pads or steel wool — scratches are permanent
  • Use acetone, solvents, or nail polish remover
  • Use pressure washer or direct high-pressure hose
  • Drag or rest hard objects against the panel surface
  • Use ammonia-based cleaners near glass inserts
  • Use caustic or strongly alkaline cleaning products

Some VDOM aluminum doors feature a door panel faced with real wood veneer or a moisture-resistant MDF core wrapped in a protective film. The aluminum frame handles the structural and weatherproofing role while the panel face delivers the warmth and texture of wood. Because of this split responsibility, care involves both the aluminum frame and the wood or film face — each with its own rules.

Wood veneer and MDF panel — the most important rule

The wood face on an aluminum entry door is protected by a lacquer or UV-oil coating, but it is still real wood (or wood-based). It must be kept dry.

This finish requires a canopy above the door. Without protection from direct rain contact, the veneer edge seals will fail within one or two seasons. This is not a guideline — it is a design requirement.

The bottom edge of the panel is the most exposed point. Inspect it each fall. Any swelling, bubbling, or coating failure at the base must be addressed immediately

Cleaning the Wood Veneer Face

  • Routine dusting: dry microfiber cloth, wiped with the wood grain direction
  • Light soil and fingerprints: a barely-damp cloth wrung almost dry. Dry immediately afterward. Never leave moisture on the surface.
  • Stubborn grime: a few drops of pH-neutral wood cleaner (Murphy Oil Soap diluted to 1/4 strength) on a barely-damp cloth. Wipe with the grain, rinse with a clean damp cloth, dry.
  • Never use: pressure washers, direct hose spray, steam, abrasive pads, bleach, ammonia, or any solvent. These will strip the protective coating and expose raw wood to weather.

Cleaning the MDF / Film Face

  • Same approach as eco-veneer interior doors: damp microfiber, mild dish soap, rinse, dry. The non-porous film surface is easy to clean.
  • Avoid edges: the edge seals where film meets aluminum are the most vulnerable point. Do not scrub edges or apply excess water pressure there.

Annual Maintenance for Wood Veneer

UV-oiled veneer panels need re-oiling every 1-2 years — when the surface appears dry or dull in raking light. Apply a thin coat of the same oil specified for your door (hard-wax oil or a dedicated exterior wood oil — contact VDOM for the specification). Rub in with the grain, let sit 15-20 minutes, buff off all excess. Let cure 24 hours before the door gets wet.

Lacquered veneer does not need periodic re-coating under normal conditions. If the lacquer begins to show wear, fine cracks, or cloudiness, apply a compatible exterior clear lacquer by brush, one thin coat, with the grain.

Glass inserts on aluminum doors — same rule as uPVC

  • Always apply cleaner to cloth first — never spray at the door.
  • Keep liquid away from the glass-to-frame joint. Water forced into this joint breaks down the glazing sealant over time.
  • Use ammonia-free glass cleaner only.
  • Inspect the glass perimeter sealant annually. Re-seal any gaps with clear neutral-cure silicone.

✓ Do

  • Install a canopy — required for this finish
  • Wipe with the wood grain — dry microfiber for dust
  • Barely-damp cloth for marks — dry immediately
  • pH-neutral wood cleaner (diluted) for stubborn grime
  • Re-oil UV-oiled veneer every 1-2 years
  • Inspect base edge each fall for swelling or seal failure
  • Apply glass cleaner to cloth — never spray at door
  • Re-seal glass perimeter annually with neutral silicone

✕ Do not

  • Install without a canopy or overhang
  • Use direct hose spray, steam, or pressure washer
  • Let moisture sit on veneer surface — dry immediately
  • Use bleach, ammonia, solvents, or abrasive pads
  • Scrub or apply pressure at film-to-frame edge joins
  • Use petroleum-based or silicone-based wood polish
  • Use ammonia-based glass cleaner near frame joints
  • Ignore base edge swelling or paint failure — address fast

04 Seasonal checklist

Take 10-15 minutes at each seasonal change to run through this checklist. Catching problems early is always easier than fixing them later.

SeasonWhat to Check and Do
FallFull clean of door, frame, and glass. Inspect all glass perimeter sealant — re-seal any gaps before winter rain. Check weatherstripping for cracks or flat spots; replace if needed. Touch up any chips or scratches on powder coat or aluminum frame before first freeze. Lubricate lock mechanism and hinges. Check threshold seal. For wood veneer panels, assess whether re-oiling is needed before winter.
WinterRinse road salt off the door and frame after salting events — salt accelerates corrosion on hardware and aluminum. Use a de-icing spray (not rock salt) if ice forms on the threshold or panel. Check that the door sweep is not displaced by ice. Do not chip ice off the door face with a scraper.
SpringFull clean after winter grime. Inspect dark-color laminate or film edges on south/west-facing doors — any lifting found now is easier to fix than after another summer. Touch up chips found over winter. For wood veneer: check base edge carefully for any swelling or finish failure. Lubricate hinges and check hinge screw tightness after winter settling.
SummerRinse pollen off monthly (or more often in high-pollen areas). Check dark-color uPVC laminate and aluminum panel edges in July-August when surface temperatures are highest. Inspect the canopy or overhang for any damage that reduces its coverage. For wood veneer panels: the surface should look consistent — any gray or darkened areas indicate UV breakdown and need a maintenance coat.

05 Troubleshooting

Most problems give you early warning signs before they become expensive. Here is what to look for and what to do.

What you seeLikely causeWhat to do
Dark-color uPVC laminate lifting at edgeHeat from direct sun softening edge adhesivePress back immediately. Apply UV-stable clear silicone along edge. Install or extend canopy.
White chalky patches on white uPVCSurface oxidation after years of UV exposureApply uPVC cleaner or white automotive polish with a soft cloth. Buff off. This restores the surface.
Water inside the door frame / on thresholdGlazing seal failure, or weatherstripping gapInspect glass perimeter sealant and all weatherstripping. Re-seal or replace as needed. Do not ignore — water reaching door core is expensive.
Aluminum frame developing white powderOxidation on exposed aluminum (paint chip or seal failure)Clean the area, apply primer rated for aluminum, then touch up with matching powder coat paint. Address immediately — oxidation spreads.
Wood veneer panel swelling at baseWater reaching the MDF or wood core through failed base sealThis is urgent. Remove the door if possible, let dry fully, re-seal all edges with exterior-grade varnish and sealant. If swelling is significant, the panel may need replacement.
Glass shows mineral spots or white ringsHard water dried on glass surfaceApply 50/50 white vinegar and distilled water. Let sit 1 minute, wipe, buff dry. Repeat if needed.
Glass seal cloudy or discolored at edgeSeal degradation from water infiltration or ageRe-seal the glass perimeter with clear neutral-cure silicone. If glass has fogged between panes, the insulating unit has failed and needs replacement.
Door hard to lock — key turns with difficultyLock mechanism needs lubrication, or misalignmentApply graphite or PTFE lubricant to keyway. If problem persists, check door alignment — a settled frame may be putting stress on the latch bolt.
Draft or cold air around door edgesWeatherstripping compressed flat or tornReplace weatherstripping. VDOM provides replacement seals by door model. This is a 30-minute fix that dramatically improves comfort and energy efficiency.

06 Warranty and getting help

VDOM Limited Warranty — what care-related issues are not covered

  • The VDOM warranty covers manufacturing defects in materials and workmanship.
  • Damage from improper cleaning, chemical contact, or impact is not covered.
  • Water damage from installations without a canopy or with a failed weatherseal is not covered.
  • Damage from power washing or high-pressure water contact is not covered.
  • Wood veneer and MDF panels installed without canopy protection are not covered for moisture damage.
  • Keep your order number. Some claims require the door model number and purchase date.

When to Call VDOM

  • You see a finish defect that appeared within 12 months of installation and is not related to cleaning or impact — this may be a warranty claim.
  • You need a matching touch-up pen or paint code for your powder coat color.
  • You need a replacement weatherseal or threshold specification for your door model.
  • You are unsure whether a cleaning product is safe for your specific finish.

Quick Reference

Safe for all VDOM entry door finishes

  • Mild dish soap in warm water — monthly wash for all doors
  • Soft microfiber cloth or non-abrasive sponge
  • 50/50 white vinegar + distilled water — mineral deposits and glass
  • Ammonia-free glass cleaner applied to cloth — glass only
  • Automotive paste wax on hardware faces — twice a year
  • Graphite or PTFE dry lubricant — lock mechanism, annually

Never use on any VDOM entry door

  • Pressure washer or steam cleaner
  • Bleach, ammonia, or chlorine-based products
  • Acetone, nail polish remover, or paint thinner
  • All-purpose household sprays (Lysol, 409, standard Windex)
  • Abrasive pads, steel wool, or stiff scrub brushes
  • Silicone furniture polish (Pledge)

Warranty

This door is covered by the VDOM Exterior Door Limited Warranty and Claims Policy. The summary below is for the installer and the homeowner; the full policy document governs in all cases.

  • VDOM INC. is the warrantor for all sales channels.
  • The first remedy for an adjustment-type issue is a repair visit — on-site hinge, seal and hardware adjustment — before any replacement is considered.
  • There is no mandatory installer certification. The full product warranty applies regardless of who installs the door; performance claims are assessed in the context of how the unit was installed.
  • Cosmetic damage, mismatched shades and deformation must be reported before installation.
  • Damage from installation not performed to this guide, from missing canopy protection in fully exposed locations, from blocked weep holes, or from third-party smart lock actuators is not covered.
  • Replacement units and parts are manufactured in Europe; plan for approximately a 4-month manufacture lead time on non-stock items.

Limited warranty and claims policy

Exterior entry doors — uPVC and aluminum systems

Warrantor VDOM INC. sales@vdom.us +1 (332) 777-7033
Warranty term 2 years from date of delivery
Applies to uPVC and Aluminum Exterior Entry Doors sold under the VDOM brand regardless of purchase channel

01Warranty coverage and term

VDOM INC. is the manufacturer and warrantor of all doors sold under the VDOM brand. This warranty is issued directly by VDOM INC. and applies regardless of where or how the product was purchased — whether through United Porte Inc., Amazon, Home Depot, or any other authorized dealer or retailer. The retailer or dealer is not a party to this warranty and has no authority to extend, modify, or limit its terms.

VDOM INC. warrants that each exterior entry door unit — including uPVC (metal-plastic) and aluminum door systems — will be free from defects in materials and workmanship under normal residential use for a period of two (2) years from the date of delivery to the original purchaser.

TermTwo (2) years
Start dateDate of delivery, as documented by shipping or delivery records
End dateTwenty-four (24) calendar months from the start date
TransferabilityNon-transferable. Applies to the original purchaser and original installation address only.
Purchase channelWarranty applies equally whether purchased directly, through Amazon, Home Depot, United Porte Inc., or any other authorized channel.
  • uPVC Entry Doors: all multi-chamber PVC profile exterior door systems, with or without sidelites and transoms.
  • Aluminum Entry Doors: all aluminum-framed exterior door systems with powder coat, sublimation/laminated, wood veneer, or moisture-resistant MDF panel finishes.
  • Factory-installed glazing units (IGUs): where seal failure causes fogging between panes within the Warranty Period.
  • Hardware supplied with the door unit: multi-point locking mechanisms, hinges, cylinders, and handles included in the original package.

This Is a Limited Manufacturer Warranty

The rights and remedies set forth in this document are the complete warranty provided by VDOM INC. No dealer, retailer, or third party can extend or modify this warranty on behalf of VDOM INC. This warranty gives you specific legal rights; you may also have additional rights under applicable state law.

02What is covered

The following defects are covered when they arise under normal residential or light commercial use within the Warranty Period.

  • Warping, bowing, or twisting of the door panel or frame that renders the door inoperable or produces a gap exceeding 3/16 in. (5 mm) at any point around the perimeter seal, under normal indoor humidity (35–65% RH).
  • Delamination or separation of the PVC laminate layer from the profile substrate, where the affected area was not directly exposed to abnormal heat sources.
  • Cracking or fracture of the PVC profile under normal operating loads and temperatures.
  • Powder coat finish failure — peeling, bubbling, or adhesion loss — on aluminum doors not attributable to impact, chemical exposure, or abrasive cleaning.
  • Sublimation/laminated finish delamination on aluminum panels, in areas not exposed to sustained direct heat from external sources.
  • Premature surface corrosion of aluminum structural components visible through the finish, in non-coastal environments (more than 1 mile from ocean) within the Warranty Period.
  • Fogging, moisture, or condensation between panes of a factory-installed IGU, indicating seal failure, where the unit was not subjected to impact or improper cleaning.
  • Visible manufacturing defects in glass (inclusions, bubbles, distortion) not identified at delivery that affect normal use.
  • Failure of the multi-point locking mechanism to operate under normal use, where the failure is not caused by misuse or over-torquing.
  • Hinge failure under normal residential door traffic and normal door weight.
  • Cylinder or handle failure under normal use conditions.

Getting the most from your warranty

  • Submit claims within the Warranty Period. Claims for defects discovered after 24 months cannot be accepted.
  • Keep your delivery documentation. It establishes your warranty start date.
  • Read the VDOM Exterior Door Care Guide included with your door. Many common issues — stiff hardware, minor seal gaps — are addressed by simple maintenance described in that guide.
  • Contact VDOM first. Many issues that initially appear to be defects can be resolved quickly with guidance from our support team, without a formal claim.

03What is not covered

The following are excluded from warranty coverage. We have structured these exclusions to be clear and fair — they target situations where the product itself is not at fault, not situations where a reasonable person would expect warranty protection.

  • Impact damage: any crack, chip, fracture, or breakage caused by physical impact — including hail, windborne stones or debris, tools, vehicles, or any external object. These are not product defects.
  • Glass breakage — important clarification: glass that breaks due to windborne debris (stones, hail, branches), thermal shock from a concentrated external heat source (reflected sunlight from pools, mirrors, or adjacent windows), or any physical impact is not a manufacturing defect and is not covered. Glass breakage claims require photographs taken at or immediately after the event. VDOM INC. will review all glass breakage claims on a case-by-case basis; if manufacturing evidence is identified, coverage will apply.
  • Thermal stress fracture: glass units exposed to sustained reflected or concentrated heat without a protective canopy may experience internal stress. This is an environmental condition, not a product defect.

VDOM exterior doors are designed to perform when installed correctly per the VDOM Installation Guide. Installation errors create performance issues that are independent of product quality. The following installation-related conditions are excluded:

  • Missing or inadequate canopy/overhang: water infiltration, finish degradation, or moisture damage where no protective overhang of at least 12 in. (30 cm) was present above the door. A canopy is a required installation condition.
  • Incorrect rough opening preparation: damage or failure caused by an unstable, improperly sized, or inadequately prepared rough opening.
  • Sealing failures at installation: water or air infiltration where frame-to-opening seals, glazing perimeter sealant, or threshold seals were not completed at installation.

We understand that most customers use their own installer or a local contractor, and we support this fully. If a claim involves a performance issue (water, air, operability) and the installation method is unclear, VDOM INC. will offer a Repair Visit (see Section 7) to assess the situation in person before making a warranty determination — rather than denying the claim based on installer status alone.

  • Chemical damage: finish or seal damage from bleach, ammonia, pressure washers, steam cleaners, acetone, paint thinner, or other prohibited cleaning agents. See the VDOM Exterior Door Care Guide.
  • Neglect: damage resulting from failure to maintain seals, weatherstripping, or hardware when visible deterioration was present and unaddressed.
  • Unauthorized modifications: alterations, repainting, hardware substitution, or application of films, tints, or coatings without written approval from VDOM INC.
  • Ceramic and porcelain panel cracking: panels with ceramic or porcelain tile inserts may crack if hardware fasteners are overtightened against the panel face. Maximum fastener torque adjacent to ceramic surfaces is 2.0 Nm (18 in-lbs). Damage from over-torquing is not a manufacturing defect.
  • Normal wear: minor surface scratches, gradual UV color shift on dark profiles without canopy shading, and weatherstripping compression set after extended service are normal wear, not defects.
  • Surface condensation: condensation on exterior glass in humid or cold conditions is a normal weather phenomenon. Interior surface condensation may indicate insufficient ventilation in the building.
  • Non-VDOM components: hardware, sealants, or glazing not supplied by VDOM INC. as part of the original door unit.
  • Coastal environments: installations within 1 mile (1.6 km) of the ocean, unless specific marine-grade hardware was ordered.
  • Extreme weather events: damage from hurricane, tornado, flood, hail, fire, lightning, or other acts of nature.

04Installation — VDOM recommended installers

Proper installation is essential for the door to perform as designed. VDOM INC. does not require the use of any specific installer as a condition of warranty coverage. However, we strongly recommend working with an installer who is familiar with European-standard door systems — the installation requirements for VDOM doors differ from standard US door products in several important ways.

United Porte Inc. provides installation services in selected US markets. United Porte installers have hands-on experience with VDOM uPVC and aluminum door systems and follow the VDOM Installation Checklist on every job. If installation by United Porte is available in your area, we recommend it — not because it is required for warranty coverage, but because it tends to produce the best outcome and makes any warranty evaluation straightforward.

To inquire about installation availability in your area, contact us at sales@vdom.us or +1 (332) 777-7033.

VDOM exterior doors can be installed by the homeowner or any qualified contractor. Full warranty coverage on product defects applies regardless of who installs the door. There is no warranty penalty for self-installation or use of a third-party contractor.

For best results — regardless of who installs

  • Follow the VDOM Installation Guide included with the door. It covers rough opening requirements, support block placement, fastening spacing, sealing sequence, and hardware torque limits.
  • Complete the Installation Checklist (Appendix A) and keep a copy. If you ever need to make a warranty claim involving a performance issue, having documented installation details makes evaluation faster and avoids back-and-forth.
  • Install a protective canopy or overhang (minimum 12 in. / 30 cm projection) above the door. This is the single most impactful step you can take for long-term door performance.
  • For ceramic or porcelain panel doors: do not use a power driver for final hardware tightening. Maximum torque on fasteners adjacent to the ceramic surface is 2.0 Nm (18 in-lbs). Use a hand screwdriver.

For claims involving product defects (delamination, hardware failure, glass seal failure, etc.), installation method has no effect on coverage. These are manufacturing issues and are evaluated the same way regardless of who installed the door.

For claims involving performance issues that could be caused by either a product defect or an installation condition — such as water infiltration, air leakage, or door alignment — VDOM INC. will request installation documentation and, where practical, offer a Repair Visit (Section 7.2) to assess the issue in person before making a final determination.

Claim typeInstallation dependent?
Structural material defect (delamination, PVC crack, finish failure)No — covered regardless of installer
Hardware/mechanism failure under normal useNo — covered regardless of installer
IGU fogging / glass seal failureNo — covered regardless of installer
Water infiltration / air leakageYes — will be assessed in context of installation documentation and/or site visit
Door misalignment / bindingYes — assessed in context of installation; minor issues often resolved by Repair Visit
Damage from prohibited cleaning agents or impactNo — excluded regardless of installer

05Technical performance standards

VDOM exterior doors are designed to meet the following performance parameters when properly installed. Each door model's Technical Data Sheet, available at www.vdom.us, specifies exact ratings for that unit.

ParameterValue / Note
Test StandardASTM E283
Maximum Air Leakage0.30 cfm/ft² at 1.57 psf (75 Pa) — per AAMA 101/I.S.2/A440
Field NoteAchieved with weatherstripping and threshold seal in serviceable condition. Replace seals if compressed or cracked — see Care Guide.
ParameterValue / Note
Test StandardASTM E331
Rated Pressure ResistancePer model Technical Data Sheet (minimum 2.86 psf / 137 Pa for standard models)
Field NotePerformance requires continuous frame-to-opening sealing and intact glazing perimeter sealant. A canopy or overhang above the door is required.
ParameterValue / Note
U-FactorPer model Technical Data Sheet (typical range 0.28–0.38 Btu/hr·ft²·°F for insulated systems)
Condensation on exterior glassNormal in humid or cold conditions. Not a defect
Condensation on interior frameMay occur in extreme cold (below −4°F / −20°C) or with very high indoor humidity. Not a manufacturing defect.
ParameterValue / Note
Canopy / OverhangRequired: minimum 12 in. (30 cm) projection beyond the door face
Rough Opening Clearance1/2 in. (12 mm) per side and at head — see Installation Guide
Sidelite Panel WidthPer model Technical Data Sheet
Threshold ModificationField modification of threshold height exceeding 1/4 in. (6 mm) voids threshold seal performance

Maximum fastener torque on ceramic/porcelain panel doors: 2.0 Nm / 18 in-lbs

  • Ceramic tile inserts will crack under excessive fastener torque. Do not use a power driver (impact driver or drill) for final tightening of any hardware adjacent to the ceramic surface.
  • Use a hand screwdriver or a torque screwdriver set to 2.0 Nm maximum.
  • Ceramic cracking caused by over-torquing is not a manufacturing defect and is not covered under this warranty.

06How to submit a warranty claim

All warranty claims must be submitted in writing. Verbal or informal claims communicated by phone call or social media message do not constitute a formal warranty submission.

Many reported issues can be resolved without a formal warranty claim. Before submitting, we encourage you to:

  • Read the Care Guide — the answer to stiff hardware, minor condensation, or surface marks is often a simple maintenance step.
  • Contact VDOM support — call or email us. Our team can often diagnose an issue from photos and walk you through a quick fix, saving you and us the time of a formal claim process.
  • Check hardware adjustment — hinges on VDOM doors are 3-way adjustable. Doors that bind or have uneven gaps can often be corrected in 10 minutes without any parts replacement.
  1. Email your claim: send the completed Claim Form (Appendix B) to sales@vdom.us with subject line: WARRANTY CLAIM – [Order Number].
  2. Acknowledgment: VDOM INC. will acknowledge receipt within 48 business hours.
  3. Evaluation: our team will review documentation and photographs. We will contact you if additional information is needed. Simple claims are typically evaluated within 5–10 business days.
  4. Remedy determination: a written determination will be issued specifying the outcome and next steps.
  5. Resolution: see Section 7 for remedy options and timelines.
  • Completed VDOM Warranty Claim Form (Appendix B).
  • Proof of purchase: order number, invoice, or purchase confirmation.
  • Proof of delivery date: delivery receipt or shipping confirmation.
  • Photographs: minimum four photos showing (a) full door exterior, (b) full door interior, (c) close-up of the defect, (d) wider context of the defect area.
  • For glass breakage: photos taken at or immediately after the event are required. Please describe the circumstances of discovery in detail on the Claim Form.
  • For ceramic panel cracking: describe the tools and procedure used during hardware installation.
  • Installation documentation if available: completed Checklist (Appendix A) or installer's name and contact. This is helpful but not required.

07Claim Evaluation, remedies, and timeline

VDOM INC. applies a consistent evaluation process to all claims. Outcomes are determined by the documentation and the terms of this warranty. Our goal is to resolve every legitimate claim fairly and as quickly as possible.

When a claim is approved, VDOM INC. will select the most appropriate remedy from the following, at its sole discretion:

  1. Repair visit — a VDOM or United Porte technician visits the installation site to assess and, where possible, resolve the issue on the spot. This is often the fastest remedy and covers a wide range of issues: hardware adjustment, hinge adjustment, additional weatherstripping, seal touch-up, cylinder re-seating, or other minor repairs that do not require new parts. A Repair Visit will be offered as the first remedy where it has a reasonable probability of resolving the issue.
  2. Parts replacement — VDOM INC. supplies replacement parts (glass unit, hardware component, panel section, frame component, weatherseal, or other component). For standard in-stock parts, these can typically be dispatched within 2–4 weeks of claim approval. Installation of replaced parts is the customer's responsibility unless a Repair Visit is arranged.
  3. Full door replacement — in cases where the defect is not repairable and no compatible replacement part is available, VDOM INC. will replace the complete door unit with one of equal or greater specification. The replacement unit carries the remainder of the original Warranty Period or 90 days from installation, whichever is longer.

Repair Visit — how it works

  • Available in service areas covered by United Porte Inc. Contact us to confirm availability for your location.
  • Scheduling: VDOM INC. will contact you within 5 business days of claim approval to arrange a visit.
  • What a Repair Visit can resolve: hinge adjustment (binding, uneven gaps), weatherseal addition or replacement, hardware re-alignment, lock mechanism adjustment, cylinder re-seating, threshold adjustment, minor sealant repair.
  • What a Repair Visit cannot resolve: structural defects requiring new components, glass unit replacement, or finish defects requiring panel replacement. These proceed to Parts Replacement.
  • No additional cost to the customer for an approved Repair Visit under warranty.
MilestoneTarget Timeframe
Claim acknowledgedWithin 48 business hours of complete submission
Evaluation decisionWithin 10 business days for standard claims
Repair Visit schedulingWithin 5 business days of claim approval (where available)
Parts replacement — in-stock components2–4 weeks from claim approval
Parts replacement — manufactured-to-order components from EuropeUp to 4 calendar months from claim approval
Full door replacementUp to 4 calendar months, depending on model and production schedule

Why some replacements take up to 4 months

VDOM doors are manufactured to order in Europe. Replacement panels, glazing units, and complete doors in nonstandard configurations are not held in domestic US inventory.

When a replacement component must be manufactured and shipped from Europe, 4 months is a realistic and honest timeline. We will provide a written estimated delivery date within 5 business days of claim approval, and will update you if that date changes.

We consider a claim open and in progress until the approved remedy is delivered and the issue is resolved.

08Limitation of liability

TO THE MAXIMUM EXTENT PERMITTED BY APPLICABLE LAW, VDOM INC.'S ENTIRE LIABILITY UNDER THIS WARRANTY IS LIMITED TO THE REMEDIES DESCRIBED IN SECTION 7. VDOM INC. SHALL NOT BE LIABLE FOR:

  • Any incidental, consequential, indirect, special, or punitive damages, including loss of use, loss of revenue, property damage to the building interior or envelope, or any other losses arising from door failure, regardless of whether VDOM INC. was advised of the possibility of such damages.
  • The cost of removal or reinstallation of non-VDOM finishes, structures, or components that must be accessed to perform warranty repair.
  • Delays in repair or replacement attributable to manufacturing and international shipping lead times as described in Section 7.3.

Some states do not allow exclusion or limitation of incidental or consequential damages, or place limits on how long implied warranties last. These limitations may not apply to you in full. This warranty gives you specific legal rights, and you may have other rights that vary by state.

09Governing law and dispute resolution

This warranty is governed by the laws of the State of New York, without regard to its conflict of law principles. Any dispute arising from this warranty that cannot be resolved through direct communication will be submitted to binding arbitration administered by the American Arbitration Association (AAA) under its Consumer Arbitration Rules, in Richmond County, New York. The arbitrator's decision is final and binding. Either party may seek injunctive or equitable relief in a court of competent jurisdiction. Nothing in this warranty limits rights the purchaser may have under applicable consumer protection laws.

Installation checklist (Appendix A) Download installation checklist

Installation checklist

Keep a completed copy of this checklist for your records. If you ever submit a warranty claim involving a performance issue, this documentation will help us evaluate it quickly. A separate copy may be submitted with a warranty claim.

Warranty claim form (Appendix B) Download warranty claim form

Warranty claim form

Complete all fields. Incomplete forms will be returned. Attach photographs before sending.
Email to: sales@vdom.us
Subject line: WARRANTY CLAIM – [Order Number]

FAQ

Almost always no. This is a lift-to-lock mechanism: close the door, lift the handle all the way up to throw the hook bolts, and only then turn the key. If the handle will not lift fully, the sash needs hinge adjustment.

The catalog size is the nominal size, not the clear opening. A 36" x 80" nominal door has a 38" x 82" unit size and a clear opening of about 32" because of the depth of the multi-chamber frame profile on both jambs.

No. Operating the multi-point mechanism without the handle and cylinder in place can rack the internal gearing and jam the mechanism.

They add to the overall unit size but not to the operable clear opening, because they are fixed, non-operable panels. Check the clear opening against egress and accessibility requirements before ordering.

Yes wherever the door is exposed to direct precipitation. It should project at least 12" (300 mm) beyond the face of the door and cover the full width of the unit including any sidelites.

Only the VDOM Smart Lock is certified for this door system. An incompatible actuator can interfere with the multi-point bolt travel, compromise weather sealing and void the door warranty.

No. Finish-matched cover caps for the anchor, hinge and handle fasteners are ordered separately.

Buildings settle. Re-check the clearances after the first 2–4 weeks and use the 3-way hinge adjustment — vertical, horizontal and compression — to bring the sash back into plane.

Schedule your appointment to visit showroom / warehouse