The phone number and address of the store that will serve you depend on the choice.
If your city is not on the list, don't worry. You can choose the company's main office or the nearest city to your location to receive the necessary information or services.
After selecting the location, simply close the window in the top right corner.
Сatalog
Our Showrooms
Our showrooms
In case you want to see the product range personally before purchasing, you can also make an appointment at our showroom/warehouse by filling out the form below
These doors are designed for installation over hard, finished flooring (wood, tile, laminate, LVT/vinyl, or bare subfloor with a defined floor-to-leaf gap Y). They are NOT designed to clear or seal over carpet. Deep pile or padded carpet will foul the bottom gap, prevent the door from closing, and void performance claims. If the room is carpeted, set the floor gap Y from the top of the finished carpet, or trim the carpet back under the door.
01 Tools required
Tape measure
Utility knife
Cordless drill / driver + bit set
Screwdriver (Phillips and flat)
Compound miter saw or hand saw
Adhesive ("liquid nails"-type MS-polymer/polyurethane, or PVA in a narrow-nozzle bottle)
Level (4-ft minimum) and framing/combination square
Chisel (for mortising hinge leaves and the lock body)
Only for specific configurations
Hinge boring / Forstner bit — only if installing concealed (hidden) hinges
Doweling jig — only if using the glued-dowel frame-corner method
02 Package contents & hardware configuration
Verify completeness against the list below before installation. This door ships in one of three hardware configurations — confirm which applies on your packing slip or sales confirmation.
Door leaf — 1 pc
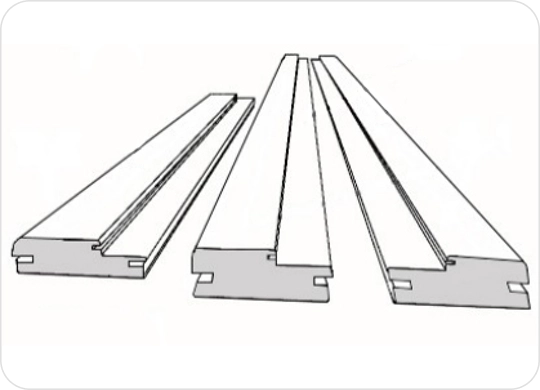
Doorframe set: jamb — 2 pcs, head — 1 pc
Casing set for two door sides: side casing — 4 pcs, head casing — 2 pcs
Weather strip (seal)
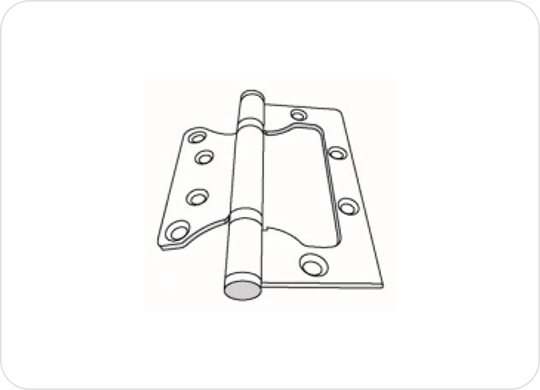
Door hinges — standard butt (“butterfly”) hinges, 2–3 pcs depending on door height
Door hardware set — see configuration A, B, or C below
Configuration
Hinges
Handle & Lock
A — Standard (base)
Standard butt (“butterfly”) hinges
American lever handle + mortise lock with cylinder and deadbolt
B — Add-on
Concealed (hidden) hinges
Same as Configuration A
C — Add-on
Standard or concealed hinges (customer’s choice)
Euro-profile lever handle + magnetic mortise lock
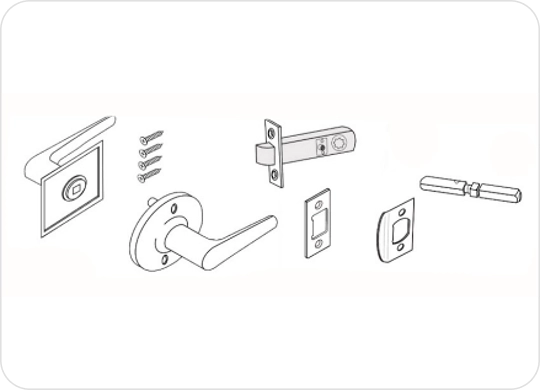
Doorframe set (jamb + head)Door latch, handle set and strike plate (Configuration A/B)Standard butt hinge (Configuration A/C default)
03 Technical information — rough opening & jamb length
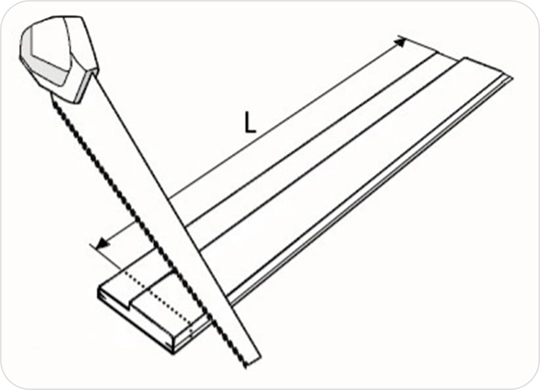
Cut the jambs to length “L” before assembling the frame:
L = H + 7/8" + Y
H — door leaf height Y — gap between the door leaf and the floor
Cutting the jamb to length L
Parameter
Typical value
Rough opening width
Door width + 2” to 2½"
Rough opening height
Door height + 1½" to 2"
Gap Y (door leaf to floor)
3/8" – 1/2" (finished flooring already installed)
Wall thickness supported
4 1/2" – 5 1/4" (standard jamb depth)
Wall thicker than 5-1/4"?
If your wall (finished surface to finished surface) is thicker than 5-1/4" — the standard jamb depth — order the Frame (Jamb) Extension add-on instead of a custom jamb. See the add-on section for sizing and fitting.
Worked example
For a 30" × 80" door leaf, the recommended rough opening is 32" wide × 81.5" high. A width of up to 32.5" is acceptable for an out-of-plumb wall, but do not go narrower than 32" — the frame and shim space will not fit and the jambs cannot be squared.
04 Step-by-step installation
Lay out all parts and confirm box contents against the Package Contents table. Confirm your hardware configuration (A, B, or C) before proceeding, since Steps 4, 5 and 9 differ for concealed hinges, and the lock/handle installation differs by configuration (see Hardware Installation).
Cut both jambs to length L using the formula in Section 03 above.
For Configuration A or B (American mortise lock), drill and mill the lock mortise and strike-plate seat now, using the door manufacturer's template — see Hardware Installation for exact dimensions and the 36–40" handle-height guideline.
Configuration C (Euro handle + magnetic lock)
Skip ahead to Hardware Installation — Option C. The magnetic lock body uses the same style mortise pocket as a standard Euro mortise lock, but the strike plate location must line up with the magnetic striker, not a spring latch — see the alignment note in that section before milling the jamb.
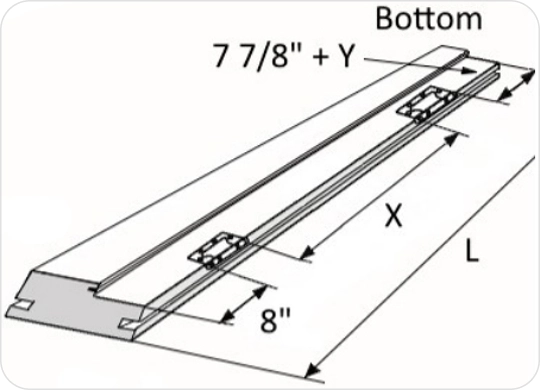
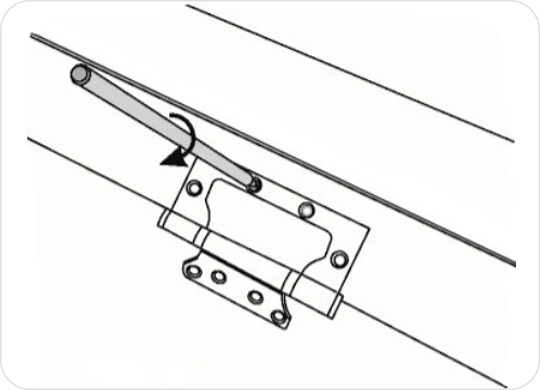
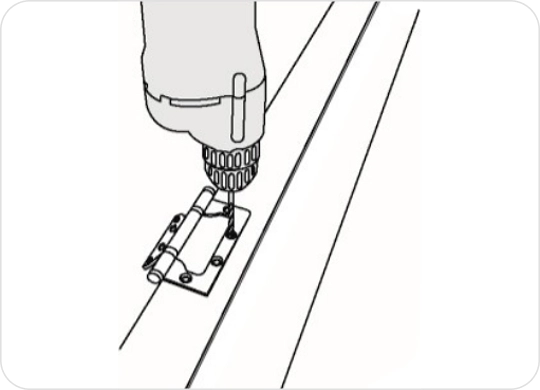
Standard hinges: locate the top hinge 8" from the jamb chamfer (to the top of the hinge barrel); locate the bottom hinge 7-7/8" + Y from the bottom edge of the jamb. Drill per the marking.
Marking and drilling hinge positions on the jamb
Add-on B/C — Concealed hinges
Do not drill screw holes at this stage. Concealed hinges use round mortised cups instead of screw-only leaves — see the Concealed Hinges add-on for boring diameter, depth and positioning before you touch a drill to the jamb.
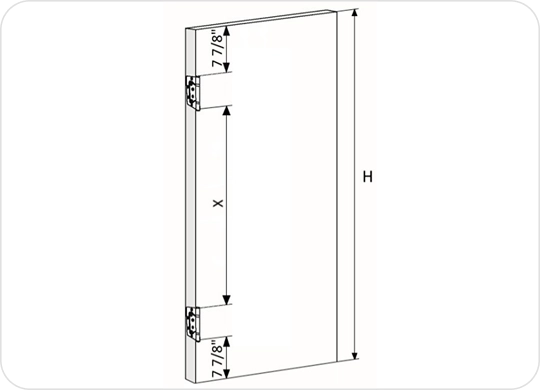
Locate the top hinge 7-7/8" from the top of the leaf and the bottom hinge 7-7/8" from the bottom (to the top of the barrel). Keep distance "X" between hinges identical on the jamb and the leaf. Drill and screw the hinges to the leaf.
Hinge spacing on the door leaf
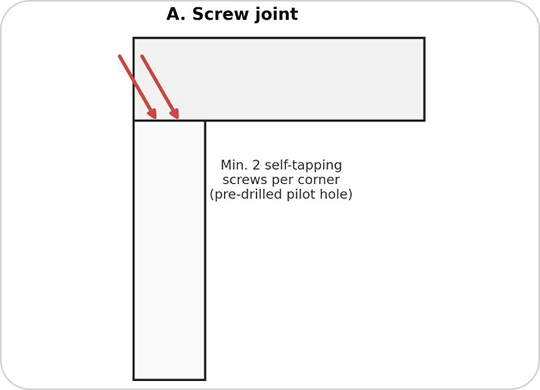
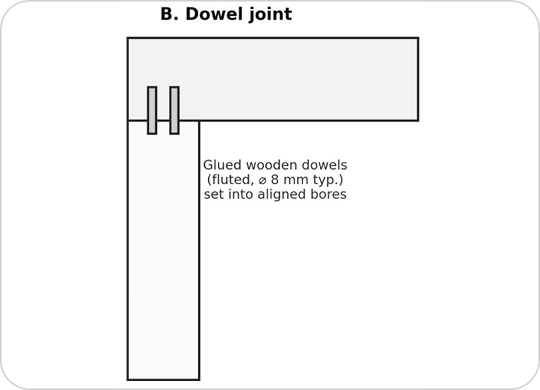
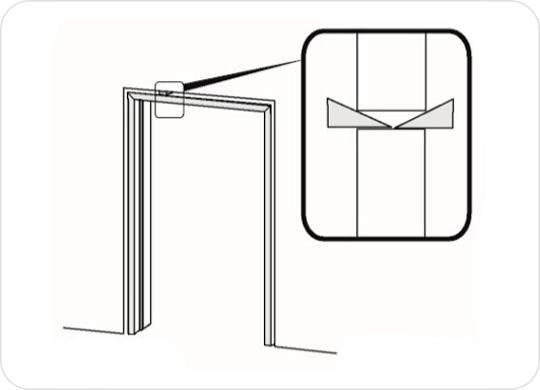
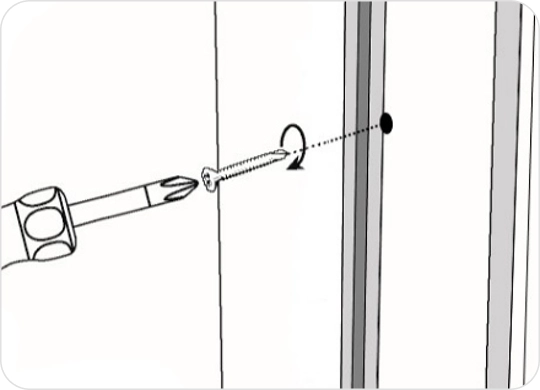
Pre-drill before fastening. Screw (or dowel) the head to each jamb. This joint carries the full weight of the leaf through the hinge-side jamb, so it must be tight and square before the frame goes into the opening.
Frame head-to-jamb corner joint — two accepted methods
Method A — Self-tapping screws (recommended for field installs)
Minimum two self-tapping screws per corner, driven through the face of the head into the end grain of the jamb.
Screw size: ~5 mm (#9–#10) diameter, 50–70 mm (2"–2¾") long — a coarse-thread "confirmat-style" screw. Use 2" on thin jamb stock; 2½"–2¾" on thicker stock or for extra pull-out resistance.
Always pre-drill a pilot hole slightly smaller than the screw shank to keep the end grain from splitting.
Countersink the head flush; the casing will hide it.
Method B — Glued dowels
Two fluted dowels per corner, 8 mm (5/16"), set into aligned pre-bored holes with a doweling jig.
Apply PVA/wood glue in each bore before inserting; clamp until set.
Leaves no visible fastener — preferred for shop pre-assembly or a fully screw-free corner.
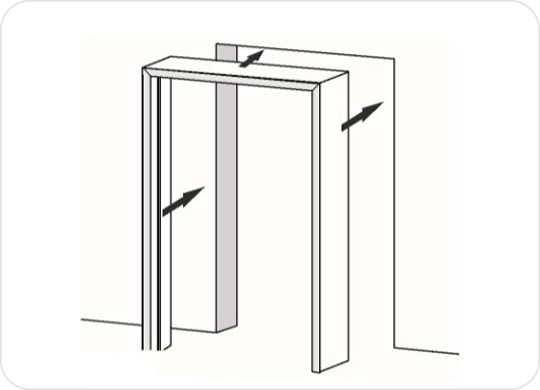
Insert the frame into the rough opening and fasten to the wall with at least three screws per side (top, middle, bottom). Install shim/gasket wedges between the frame and the wall to prevent deflection. Place fasteners where the weather strip (seal) will later cover them.
Inserting, shimming and fastening the frame into the rough opening
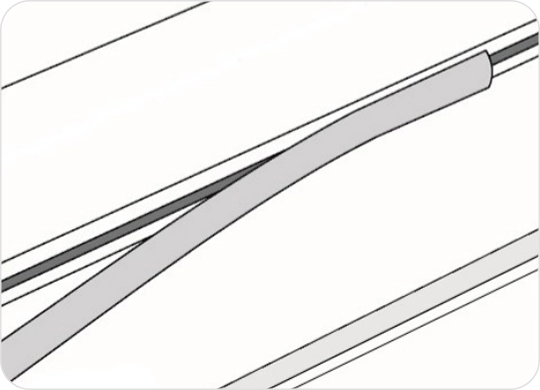
Insert the weather strip (seal) into the doorframe groove.
Installing the weather strip
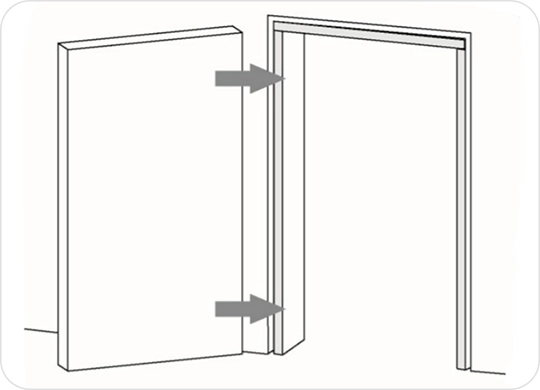
Insert the leaf into the frame and fix the hinges with screws in the pre-marked places (Step 5).
Add-on B/C — Concealed hinges
The Concealed Hinges add-on replaces this hanging step with its own 3D-adjustment procedure — see the add-on section.
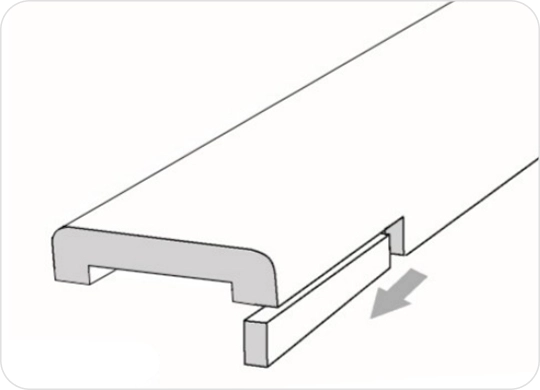
Cut the side casings about 9/16" longer than the doorframe. Remove the lateral leg so the casing fits into the doorframe groove.
Removing the lateral leg to fit the casing
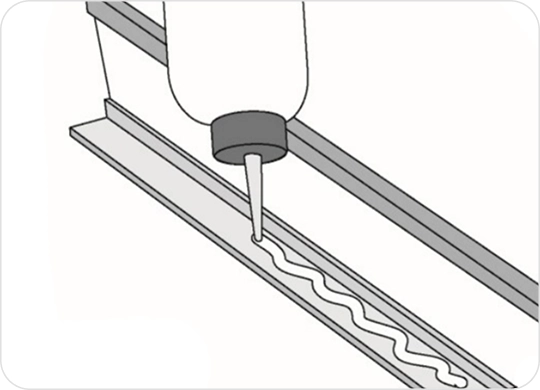
Apply adhesive to the inner side of the casing leg and insert it into the frame groove. Measure the distance between side casings, then cut the head casing to length and fit it the same way.
Applying adhesive to the casing leg groove
Which adhesive to use
Run a CONTINUOUS bead of polymer construction adhesive ("liquid nails"-type MS-polymer/polyurethane) or PVA wood glue — from a narrow-nozzle bottle — along the full length of the casing-leg groove, not a few dabs. Press the casing in immediately and hold/tape it for the adhesive's tack time.
A continuous, narrow bead gives a tight, rattle-free casing with no visible fasteners. Avoid gap-filling amounts — squeeze-out is harder to clean from the reveal than a light, even bead.
On uneven walls, a few finish nails through the casing into the jamb can hold a stubborn section flat while the adhesive cures — but the adhesive bead, not the nails, keeps the casing tight over time.
05 Hardware installation — standard: American lever handle & mortise lock
This is the standard hardware set for Configuration A/B. It uses a mortise lock body with a lever handle on both faces, a fixed cylinder, and a deadbolt operated by key or thumb-turn.
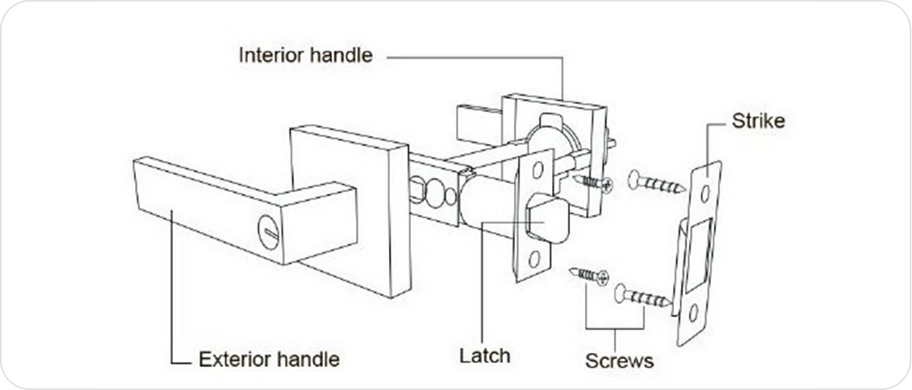
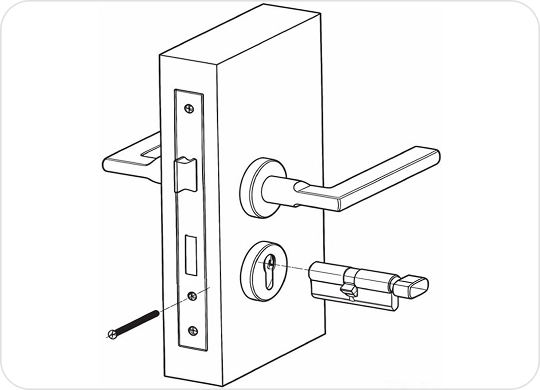
Hardware layout — handle, latch & strike
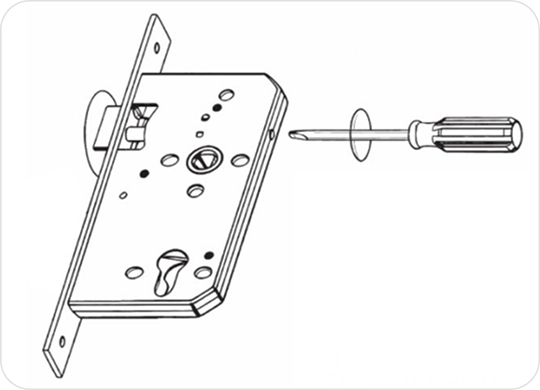
This is the base hardware set included with every Configuration A/B door — it is not a separate add-on, so the exploded view below is provided here for reference before you start the door and jamb prep in Steps 3–5 above. It shows how the exterior handle, interior handle, latch and strike plate fit together across the door edge and the jamb.
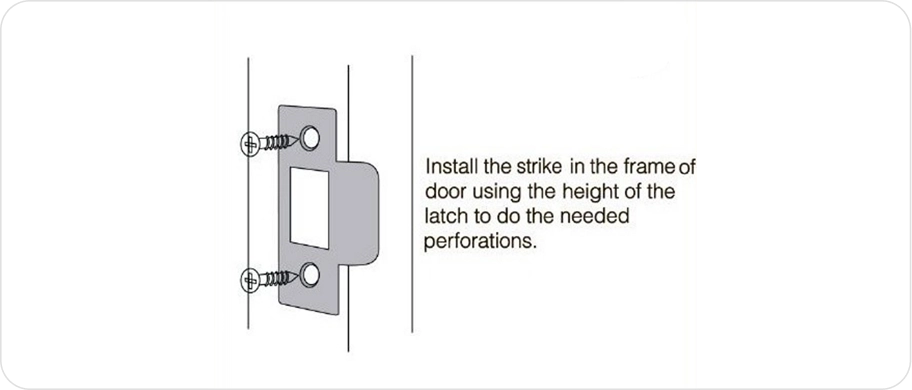
Strike plate installed in the jamb — engages the latch when the door closes
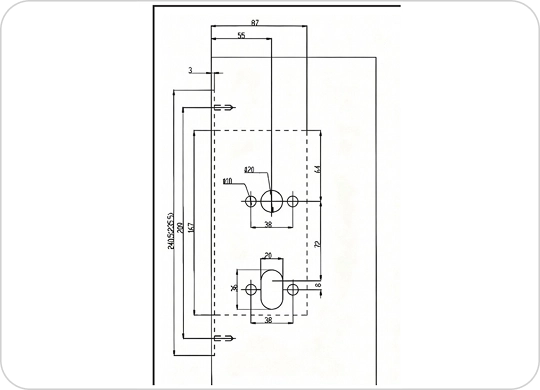
Door preparation for Euro handle and magnetic lock
Best height for the mortise lock is 36–40" from the bottom of the door to the lever-handle center. Print the 1:1 paper template supplied with the hardware and stick it to the door edge when marking out the mortise. Provide the lower cylinder pre-cut only for privacy or keyed-entry functions; omit it for passage-function hardware.
Insert the lock body into the mortised cavity and fasten the mounting screws.
Set the latch-bolt direction — the bevel must face the direction the door closes (toward the strike). To reverse: push the latch bolt in with a screwdriver, rotate 180°, then release.
Install the striking plate and pocket in the jamb, and fasten the screws.
Install the lever handle and spindle — insert the spindle keeping the distance to both faces equal; the set screw fixes on the thinner side of the spindle (screw bolt sits on the outside of the door).
Fasten the rosette
Install the cylinder and fasten the cylinder fixing screw (M5 × 2 1/2").
Install the escutcheon base (screw bolt on the outside), then fasten the escutcheons.
Test the lock — operate the lever to confirm the latch retracts smoothly; turn the cylinder knob and the key to check the deadbolt. Repeat until both work smoothly, then fasten all remaining screws.
Configuration C — Euro handle + magnetic mortise lockConfiguration C — Euro handle + magnetic mortise lock
If your order is Configuration C, the mortise pocket is the same style, but the lock is a silent magnetic mortise lock (no spring latch) with a Euro-profile lever. Align the jamb strike to the magnetic striker rather than a latch nose, and confirm the leaf self-closes from a few cm ajar before final fastening.
06 Add-on: concealed (hidden) hinges
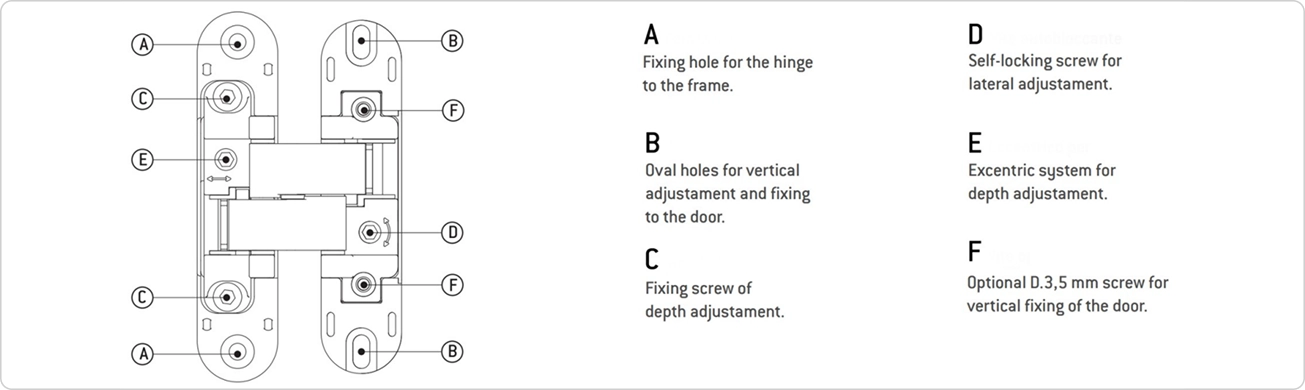
Replaces the standard butt hinges in Steps 4, 5 and 9. When the door is closed, no hinge barrel or leaf is visible from either face. Supplied as a matched 2-piece (or 3-piece on taller/heavier doors) set with independent 3-way adjustment.
Concealed hinge — mortised cup principle and 3D adjustment axes
Using the routing template, mark the mortise locations on the door edge and the matching jamb at the hinge heights from Steps 4–5.
Machine the mortises to the template's dimensions with the specified router bit and guide bushing; hold the required depth and alignment on both door and frame sides.
Seat the hinge sections and secure with the specified screws — do not overtighten.
Support the leaf, connect the door-side and frame-side sections, and confirm the arms engage fully and move freely.
Close the door, inspect the perimeter reveal, and adjust: height (raise/lower), lateral (left/right), depth/compression (in/out relative to the frame face). Make small, equal adjustments at all hinges, then tighten all screws.
Hardware compatibility
Concealed hinges combine with either the American mortise lock or the Euro handle + magnetic lock — the hinge choice and the lock/handle choice are independent options.
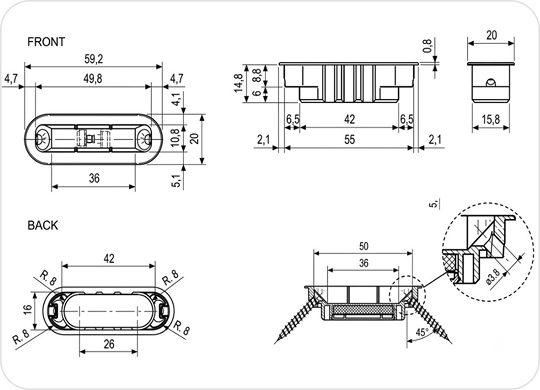
Add-on: magnetic bottom stopper
A concealed magnetic hold-open at the bottom of the door: a magnet mortises into the bottom edge and a matching pin installs in the floor at the open position. When the door reaches it, the magnet engages the floor pin and holds the door open; pulling the door releases it.
Before you drill
This stopper is strongly magnetic — keep it away from metal objects, credit cards and electronic/magnetic media before installation. On tile or stone, score with a diamond bit first to prevent chipping.
Open the door to the desired hold-open position and mark the floor directly below the magnet centerline.
Remove the door; mark the bottom-edge centerline and drill the magnet recess to the specified diameter and depth; drill two 1/8" pilot holes ~3/4" deep for the mounting screws.
Install the magnet assembly in the correct orientation and secure with the supplied screws — do not overtighten.
Drill the floor hole 9/16" dia. × ~2" deep, clear debris, seal and seat the sleeve, and let it cure.
Insert the floor pin correct-end-up, rehang the door, and test engagement/release; adjust the pin location if needed.
Add-on: concealed automatic bottom seal (drop seal)
Fits into a routed groove in the bottom rail. The seal bar sits retracted while the door is open and drops automatically to seal the floor/threshold when the door closes — improving sound, smoke, insect, weather and light performance without a visible sweep. Fastened by wing flanges along the housing.
Cut to length from ONE end only, so the factory end cap stays in place.
Slide the housing into the routed groove and fasten through the wing flanges (~5 mm in from each face) with the screws provided.
Drive the retaining screw(s) through the door face into the housing end bracket to lock it in the groove.
Calibrate the drop with the (+/−) screw — up to ~13 mm maximum drop — so the bar contacts the floor evenly across the full width without dragging.
Add-on: frame (jamb) extensions
For walls thicker than 5-1/4" (finished face to finished face), order jamb extensions rather than a custom-depth jamb. Supplied in 4" and 8" widths, each with a factory-milled tongue on one edge and a casing groove on the other, matching the main jamb.
4" extension — covers up to ~8-1/4" total jamb depth; 8" extension — up to ~12-1/4".
Measure the finished wall thickness at head and both sides; subtract the ~4-9/16" (116 mm) jamb depth to find the exposed extension width, then add the machined insert depth for the cut width.
Rip to width from the PLAIN outer edge only — never trim the machined insert edge or the outer casing groove.
Dry-fit, then glue the insert edge into the jamb groove, seat fully, clamp/brace until cured, and only then install the casing into the extension's outer groove.
07 Installation errors & troubleshooting
Symptom
Likely cause
Fix
Door binds on the jamb at top or bottom corner
Frame not square, or hinge-side jamb screwed/doweled slightly out of plane
Re-check frame diagonal measurements before final wall fastening; on concealed hinges, use the depth/side adjustment
Gap between head and jamb visible after trim
Only one screw or dowel used per corner
Always use a minimum of 2 fasteners per corner (Step 6)
Leaf sags over time on the hinge side
Short hinge screws only reached the jamb, not the wall stud
Replace one screw per hinge with a longer 2"–3" wood screw into the stud
Concealed-hinge reveal gap on the lock side
Hinge not adjusted after hanging
Use the 3-way (height/depth/side) adjustment from the Concealed Hinges addon
Magnetic latch does not pull door fully shut
Striker misaligned with the latch/catch
Shim/re-mortise the striker in ~1 mm steps toward the latch until it self-closes from a few cm ajar
Deadbolt/cylinder hard to turn
Frame or leaf slightly out of square, binding the bolt
Loosen frame fasteners, re-square, and refasten before re-testing the lock
Care guide
These are interior doors for indoor use only. With minimal routine care the finish and hardware will stay serviceable for years.
Routine cleaning
Wipe with a soft, dry or slightly damp microfiber cloth. For marks, use a well-wrung cloth with mild pH-neutral soap, then dry immediately.
Never use abrasive pads, scouring powders, solvents, acetone, bleach, or ammonia glass cleaners on the leaf or hardware finish.
Do not let water stand on any edge or joint — the core is wood-based and can swell if moisture penetrates a seam.
Finish-specific notes
Eco-veneer / laminate faces: clean along the grain; avoid soaking. Touch up minor scuffs with a matching wax stick.
Painted (acrylic) faces: clean gently — do not scrub. High-gloss faces show swirl marks, so use a clean microfiber and light pressure only.
Glass inserts (if fitted): clean the glass with a damp cloth, not spray cleaner, to keep liquid out of the glass-to-panel joint.
Hardware & moving parts
Twice a year, check and snug hinge and strike screws, and confirm the latch/deadbolt operate smoothly.
Lubricate the lock/latch with a dry PTFE or graphite lubricant — not oil, which attracts dust.
Re-check concealed-hinge adjustment seasonally if the building moves; small equal adjustments keep the reveal even.
Indoor use only
This is an interior door. Do not install it as an exterior/entry door or in a bathroom/sauna with standing humidity, direct water, or large temperature swings — these conditions are outside its design and void performance claims.
Interior door care guide
How to keep your doors looking their best — for years
This guide covers day-to-day care for all United Porte interior finishes — wood veneer, eco-veneer (film wrap), painted acrylic, primed, and high-gloss. Jump to the section that matches your door, or start with the general principles that apply to every finish.
01 General care principles
These rules apply to all United Porte finishes regardless of which type you have. They form the foundation of long-term door care — ignore them and even the most durable finish will show premature wear.
SartoDoors interior doors are engineered for controlled indoor environments. They are not rated for exterior use, garages, laundry rooms with open steam, or any space where humidity regularly exceeds 70%. Installing interior doors in high-moisture zones voids the warranty and causes delamination, swelling, and finish failure regardless of finish type.
Humidity: the #1 cause of interior door damage
Keep indoor relative humidity between 35% and 55% year-round. In winter, use a humidifier in rooms where heating drives humidity below 30% — this is when veneer and solid-core doors crack or warp.
In summer, run air conditioning or a dehumidifier if humidity climbs above 60%. Never place a diffuser, humidifier, flower vase, or fish tank directly next to a door.
A consistent, gentle cleaning routine prevents the buildup of grime that forces you into harsher cleaning later. This simple process takes under two minutes and should be done weekly in high-traffic areas.
Dust first: Use a dry microfiber cloth or a soft feather duster. Always wipe with the grain (vertical strokes on most doors). Dust settles into texture grooves — never skip this step before wet-wiping.
Damp-wipe: Lightly dampen a clean microfiber cloth with plain lukewarm water. Wring it until almost dry — the cloth should feel barely moist, not wet. Wipe the surface in gentle passes.
Dry immediately: Follow with a dry microfiber cloth. Never leave water sitting on any door surface. Even briefly standing water can cause micro-lifting of finish edges.
Spot-clean smudges and fingerprints: with a small amount of diluted dish soap (one drop in a cup of water) on a microfiber cloth. Rinse the spot with a barely-damp clean cloth, then dry.
Never use these on any United Porte finish
Bleach, ammonia, or chlorine-based cleaners (Pine-Sol, Windex, Comet, Clorox wipes).
Abrasive pads, sponges with a scratchy side, steel wool, or scrub brushes.
Acetone, nail polish remover, paint thinner, or mineral spirits.
All-purpose spray cleaners (Lysol, 409, Fantastik) — these often contain solvents.
Steam cleaners or pressure washers.
Furniture polish containing silicone (Pledge) — leaves residue that attracts dust and can cloud finishes.
Door hardware is not part of the door finish but directly affects door performance and the surface around it.
Wipe handles, knobs, and hinges with a dry or slightly damp cloth. Use a finish-matched metal cleaner for tarnish if needed, but keep the cleaner away from the door surface.
Lubricate hinges annually with a dry PTFE lubricant or a light machine oil. Squeaky hinges create vibration stress on the door panel over time.
Check door alignment every 6-12 months. A door that drags or binds at the frame is usually a hinge or settlement issue — do not sand or plane the door edge before checking hinge alignment.
Tighten loose hinge screws immediately. A loose hinge causes the door to sag and drag, which scuffs the bottom edge and the frame.
02 Wood veneer finish
Wood veneer doors have a thin layer of real hardwood — typically 0.5 mm to 1.5 mm thick — bonded to an engineered core. The grain, texture, and warmth are genuine wood, which means they respond to their environment the way wood does: expanding in humidity, contracting in dry air, and absorbing stains if left unsealed or improperly cleaned.
Because the face layer is thin, sanding through the veneer is easy and irreversible. Never sand a veneer door to “refresh” it. The protective coating (lacquer or oil) is what you clean and maintain — not the wood itself.
Understand your veneer before you clean it
Lacquered / UV-coated veneer (most common): has a clear hard film on the surface. Feels smooth. Repels moisture well.
Oiled veneer: feels slightly more matte, sometimes slightly warm to the touch. Needs re-oiling every 1-2 years.
Check your order confirmation or the door edge label for finish type.
Daily / weekly: dry microfiber cloth. Always wipe with the wood grain — cross-grain wiping can catch in texture and create micro-scratches.
Light soil / smudges: barely-damp microfiber cloth with plain water. Dry immediately. This handles 90% of cleaning needs.
Stubborn grime or greasy marks: a few drops of pH-neutral wood cleaner (Murphy Oil Soap diluted to 1/4 strength, or a product labeled safe for lacquered wood) on a damp cloth. Wipe, then rinse with a clean damp cloth, then dry.
Glass inserts (if present): clean glass with a glass cleaner sprayed onto the cloth — never directly onto the door. Wipe glass only; keep cleaner away from the veneer border.
Water is veneer's most dangerous enemy — not because of the water itself, but because of what happens when it gets under the coating and reaches the wood layer.
Signs of moisture damage to catch early
White hazy rings or marks on the surface — trapped moisture under the coating.
Slight bubbling or lifting at edges or corners — delamination beginning.
Swelling at the bottom of the door — humidity infiltrating from the floor level.
Dark staining along grain lines — moisture has reached the wood.
If you catch these early, stop the moisture source first. A furniture conservator can sometimes reverse early-stage hazing.
Never wet-mop a floor right up to the door base without immediately drying the door bottom. Use a floor protector or door sweep.
Never use a wet cloth on veneer. Barely damp only. The cloth should not leave any standing water on the surface at any point.
If water is spilled on the door, blot immediately with a dry cloth. Do not rub — rubbing spreads the water and can lift the finish edge.
✓ Do
Dust with dry microfiber, moving with the grain
Use barely-damp cloth for soil, dry immediately
Use diluted pH-neutral wood cleaner for grime
Re-oil oiled veneer every 1-2 years (product-specific)
Keep humidity 35–55% year-round
Blot spills immediately, never rub
Use door sweep at base to prevent floor moisture
Clean glass inserts with cloth, not direct spray
✕ Do not
Use wet or soaked cloths on veneer surface
Wipe cross-grain — always go with the grain
Use ammonia, bleach, or alcohol-based cleaners
Apply furniture polish with silicone (Pledge, etc.)
Sand veneer surfaces — the layer is thin
Place humidifiers or vases directly adjacent
Leave water sitting on the surface, even briefly
Use abrasive pads or scratchy sponges
If your doors have an oiled finish (this is specified in your order), the oil needs periodic replenishment as it depletes from cleaning and normal use. A properly maintained oil finish actually improves with time — an unmaintained one will look dry, dull, and eventually gray.
Re-oil frequency: every 12-24 months in normal use, or when the surface appears dry or dull when viewed in raking light.
Product to use: the same oil specified in your door documentation (typically a hard wax oil or specific wood oil). Do not substitute with linseed oil, olive oil, or cooking oils — these turn rancid and stain.
Application: apply a thin coat with a lint-free cloth, rub in with the grain, let sit 15-20 minutes, then buff off all excess. Wipe with the grain throughout. Let cure 24 hours before normal use.
Patch repair: small scratches in oiled veneer can be spot-oiled. Clean the area, apply a tiny amount of oil, buff. This often makes scratches nearly invisible.
03 Eco-veneer (film wrap) finish
Eco-veneer (also called film wrap, PVC, or CPL) is a durable decorative film applied over an engineered core. It resists everyday wear well, but edges and corners are sensitive to heat and solvents. Care focuses on gentle cleaning and keeping heat sources away from film edges.
Unlike wood veneer, eco-veneer has no open grain to nourish. The film surface is non-porous, so water beads rather than soaking in — but solvents and heat can soften or lift the wrap, especially at edges.
Key characteristics of film-wrap doors
Non-porous: easy to wipe; liquids sit on the surface until removed.
Heat-sensitive: localized heat can lift film edges or cause bubbling.
Chemical-sensitive: acetone, thinners, and strong solvents attack the film.
Impact-sensitive: sharp impacts can dent or puncture the wrap; repairs are limited.
Regular cleaning: dry or slightly damp microfiber cloth. Eco-veneer is the most forgiving finish to clean — most marks wipe off easily with plain water.
Dried food, crayon, or marker: slightly dampen the cloth with a diluted mild soap solution (dish soap, 2-3 drops per cup of water). Wipe the mark, then follow with a clean damp cloth, then dry.
Permanent marker or ink: a small amount of rubbing alcohol (isopropyl, 70%) on a cotton ball can remove ink. Use sparingly — blot the mark, do not rub. Test in an inconspicuous spot first. Do not use acetone.
Greasy fingerprints: diluted dish soap on a damp cloth handles these easily. The non-porous surface releases oils without needing any solvent.
Textured surface grooves: use a soft toothbrush or the corner of a microfiber cloth to dislodge grime from deep texture patterns. Always damp, never abrasive.
Edge lifting caused by localized heat is a common failure point on film-wrap doors. Once an edge lifts, dirt works under the film and the lift spreads.
Heat risks for film-wrap doors
Do not hang damp towels on doors in bathrooms near hot air from blow dryers.
Keep hair styling tools (curling irons, flat irons) at least 12 inches away from the door surface.
Avoid mounting doors adjacent to cooking ranges or toasters without a heat buffer.
Use window film or shading for doors in direct sustained sunlight.
If a small edge begins to lift, clean the area, apply a thin bead of PVA wood glue under the film with a fine tip, press flat with light pressure, and clamp or tape until cured. Larger lifts need professional repair.
✓ Do
Clean with dry or barely-damp microfiber cloth
Use mild diluted soap for dried soil or grease
Keep heat sources at least 12" from the surface
Dry after any damp cleaning
Test alcohol spot-cleaning in a discreet area first
Address lifted edges early with PVA glue
Shade doors from sustained direct sunlight
Wipe spills promptly
✕ Do not
Use acetone, paint thinner, or solvent cleaners
Hang wet towels or damp items on the door
Use bleach or ammonia-based cleaners
Apply heat from styling tools near film edges
Use abrasive pads or Magic Eraser aggressively
Ignore small edge lifts — they spread
Spray cleaners directly onto the door
Place hot appliances against the door face
04 Painted (acrylic) and primed doors
Factory-painted acrylic doors arrive with a durable water-based topcoat. Primed-only doors are ready for field painting. Both share the same care principles for cleaning and moisture; touch-up differs once a finish color is applied.
Factory acrylic coatings are water-based, form a hard protective film, and are available in sheen levels such as matte, satin, and semi-gloss. Matte hides minor marks but scuffs more easily; higher sheens wipe cleaner but show swirl marks more readily.
Regular cleaning: dry microfiber cloth or barely-damp cloth with plain water. Dry immediately.
Grime and fingerprints: diluted mild dish soap solution on a microfiber cloth. Rinse with a barely-damp cloth, then dry.
Scuffs: try a damp cloth first. A lightly dampened Mr. Clean Magic Eraser can lift scuffs on semi-gloss — use minimal pressure and avoid matte/satin finishes, which can burnish or dull.
Stickers or adhesive residue: vegetable or baby oil on a soft cloth, then wash with mild soap and dry.
Crayons or wax: gently scrape with a plastic scraper, then clean remaining marks with a dab of white toothpaste on a soft cloth. Wipe clean and dry.
Acrylic-painted and primed doors — moisture concerns
MDF and engineered cores swell if water sits at the bottom edge — dry after mopping nearby.
Bathroom doors need an adequate undercut/gap for ventilation; do not seal the room airtight against the door.
Keep relative humidity in the 35–55% range like all interior doors.
Primed doors: seal all four edges (including top and bottom) before or during field painting to reduce moisture uptake.
Acrylic touch-ups are more forgiving than solvent-based coatings because water-based paints feather and blend better at edges. Even so, spray-applied factory finishes will show brush marks on close inspection. Manage expectations accordingly.
For small chips: clean the area with a damp cloth, dry, then apply matching acrylic paint with a fine artist's brush in multiple thin coats.
For larger areas: full panel re-painting gives the best result. Lightly sand (220 grit), wipe dust, apply a compatible acrylic primer coat, then two finish coats.
Sheen matching: always match the sheen level. A satin touch-up on a matte panel is visible even with a perfect color match.
✓ Do
Clean with dry or barely-damp microfiber
Use mild diluted dish soap for fingerprints
Seal all four edges on primed doors before painting
Match sheen when touching up
Apply thin touch-up coats and feather edges
Dry the bottom edge after mopping nearby
Keep humidity 35–55%
Test Magic Eraser on an inconspicuous spot first
✕ Do not
Use bleach, ammonia, or solvent cleaners
Scrub matte finishes with abrasive pads
Leave water sitting at the door bottom
Skip sealing top and bottom edges on primed doors
Apply thick single-coat touch-ups that leave ridges
Mix sheen levels on the same face
Sand more area than needed for the repair
Install in steam showers or unconditioned spaces
05 High-gloss finish
High-gloss lacquer is highly reflective and shows every mark, swirl, and watermark. It rewards careful technique: clean cloths, straight strokes, distilled water, and immediate drying.
Gloss finish — key characteristics
Highly reflective — fingerprints and dust are more visible than on matte or satin.
Hard but brittle — impacts can chip; avoid abrasive contact.
Shows swirl marks from circular wiping.
Sensitive to mineral deposits from tap water left to dry.
Gloss surfaces require clean, lint-free microfiber and a careful sequence. The wrong technique polishes in scratches rather than removing them.
Remove dust first: use a clean, dry microfiber cloth in straight, light passes. Never use a paper towel, tissue, or cotton cloth — these are coarse enough to micro-scratch gloss under light pressure.
Damp-wipe: lightly dampen a separate clean microfiber cloth with plain distilled water (tap water leaves mineral spots on gloss). Use straight, consistent strokes — do not use circular motions, which leave visible swirl marks.
Buff dry: immediately follow with a third dry microfiber cloth using the same straight-stroke technique. Do not let water air-dry on gloss — watermarks are almost impossible to remove once dried in.
Fingerprints: a microfiber cloth with a tiny amount of diluted dish soap (1 drop per cup of distilled water) removes fingerprint oils cleanly. Follow with a damp rinse cloth, then dry immediately.
Persistent smears: a small amount of diluted white vinegar (1 part vinegar, 4 parts distilled water) on a microfiber cloth removes haze and smears effectively on gloss lacquer. Rinse with a plain damp cloth and dry.
What damages gloss finishes
Paper towels, tissues, or cotton cloths — all scratch gloss under normal wiping pressure.
Circular wiping motions — create visible swirl marks in the finish.
Tap water left to air-dry — mineral deposits etch into the surface.
Any abrasive cleaner, including baking soda, powder cleaner, or scrub pads.
Direct sunlight for extended periods — can yellow or cloud some gloss lacquer finishes over time.
Silicone-based polishes — leave a residue film that looks good initially but clouds and attracts dust.
✓ Do
Use only clean, lint-free microfiber cloths
Dust dry first before any damp cleaning
Use distilled water — tap water leaves mineral spots
Wipe in straight strokes, never circular
Buff completely dry immediately after damp cleaning
Diluted dish soap (1 drop per cup) for fingerprints
Diluted white vinegar for smears and haze
Clean frequently — less buildup means less effort
✕ Do not
Use paper towels, tissues, or cotton cloths
Wipe in circular motions — causes swirl marks
Let water or cleaning solution air-dry on the surface
Use any abrasive cleaner or scrub pad
Apply silicone-based furniture polish or Pledge
Use solvent-based or ammonia-based cleaners
Leave in direct sustained sunlight
Use the same cloth for dusting and damp-wiping
06 Glass insert care
Many SartoDoors interior doors include decorative glass inserts — frosted, clear, mirror, or opaque black glass. Each type has different cleaning needs, and all share one critical rule: keep cleaning agents away from the joint between the glass and the door panel.
The joint between glass and door panel — critical warning
The joint between glass and door panel — critical warning
The seam where the glass meets the surrounding door panel (whether MDF, veneer, or film) is the most moisture-vulnerable point on any glazed door.
Never spray or pour liquid directly onto the door surface. Always apply cleaning solution to the cloth first, then wipe.
Never allow soapy water, glass cleaner, or any liquid to run into this joint. Even a small amount that seeps through the seal and reaches the MDF core will cause irreversible swelling — the door panel will bubble, and the glass may lose its seal.
When cleaning glass inserts, work from the center of the glass outward, stopping at least 1/2 inch (12 mm) from the panel edge. Then wipe the panel separately with its appropriate cleaner.
If you see water or cleaning solution at the joint after cleaning — blot it up immediately with a dry cloth.
Frosted glass (acid-etched or sandblasted) has a textured, matte surface that scatters light. The texture traps residue more easily than clear glass and requires gentler cleaning.
Routine cleaning: a barely-damp microfiber cloth with plain water removes most dust and light soil. Wipe gently — the texture holds dirt loosely and releases it without scrubbing.
Smudges and fingerprints: diluted mild dish soap on a damp microfiber cloth. Rinse with a clean damp cloth, pat dry. Do not rub hard — aggressive rubbing drives residue deeper into the texture.
Never use: abrasive cleaners, scouring pads, or anything that scratches — the frost texture is a surface treatment and cannot be restored once abraded.
Streaks on frosted glass: are rare because the texture diffuses light, but if soap residue is visible after drying, wipe gently with a plain damp cloth to remove the residue.
Clear glass panels show every smudge, water spot, and streak immediately. The approach here prioritizes streak-free results.
Best technique: spray glass cleaner (Windex or equivalent) onto a clean microfiber cloth — never directly onto the glass, as overspray will reach the joint. Wipe in straight overlapping strokes.
Mineral spots and hard water deposits: a solution of 50% white vinegar and 50% distilled water on a microfiber cloth removes mineral deposits effectively. Apply, let sit 30-60 seconds, wipe, and dry.
Dry immediately: use a second dry microfiber cloth or a lint-free chamois to buff dry before the cleaning solution air-dries and leaves streaks.
Mirror glass inserts have a reflective silver or aluminum backing that is protected by a paint layer on the rear face. The mirror surface itself is the front face and is cleaned like clear glass, but with additional caution about the edges.
Clean the front face: same method as clear glass — glass cleaner applied to the cloth, straight strokes, buff dry.
Never wet the edges or back: moisture reaching the mirror backing through the edge will cause black edge spots (mirror rot) — a permanent oxidation of the silver layer. Keep the edges dry.
Never use ammonia-based cleaners on mirror: over time, ammonia attacks the silver backing through micro-pores in the edge seal. Use ammonia-free glass cleaner for mirror inserts.
Opaque black glass (also called lacquered glass or back-painted glass) is a clear glass panel with an opaque coating on the rear face. The front surface is smooth and glass-like; the back coating is more delicate.
Front face cleaning: same as clear glass. Glass cleaner on cloth, straight strokes, dry immediately. The glossy black surface shows fingerprints prominently — wipe after each use in high-traffic locations.
Never clean the back face: the opaque coating on the rear is not designed for cleaning or contact. It faces the door panel interior and should never be accessible. If the panel is ever removed, handle it by the edges only.
Avoid ammonia on opaque black glass: ammonia-based cleaners can cause hazing or discoloration of the back coating if they work around the edge. Use ammonia-free glass cleaner.
✓ Do
Apply all cleaners to the cloth first — never spray at the door
Work from center of glass outward, stop 1/2 inch from edge
Blot any moisture at the glass-to-panel joint immediately
Use microfiber cloths only — never paper towels on glass
Buff dry before solution air-dries (prevents streaks and spots)
Use ammonia-free cleaner for mirror and black glass
White vinegar solution for mineral deposits on clear glass
Wipe panel area separately with its own appropriate cleaner
✕ Do not
Spray liquid directly onto the door — always onto the cloth
Allow liquid to run into the glass-to-panel joint
Use ammonia-based cleaners on mirror or opaque black glass
Scrub frosted glass with abrasive pads or rough cloths
Wet the edges or back face of mirror panels
Use the same cloth for glass and panel surfaces
Let cleaning solution air-dry — always buff dry immediately
Use paper towels — lint and wood pulp micro-scratch glass
07 Indoor use only — no exceptions
SartoDoors interior doors are designed exclusively for interior use
Any direct contact with outdoor conditions will cause irreversible damage and immediately voids the product warranty.
Exterior installation: UV radiation, rain, freezing temperatures, and outdoor humidity will delaminate veneer and film finishes, swell MDF cores, crack paint, and cause glass seals to fail. This is not a gradual process — visible damage typically occurs within weeks.
Doors adjacent to exterior entries (mudrooms, covered porches): if the door faces an unheated, uninsulated space — or if outdoor air, rain splash, or frost can reach it — it is not in an interior environment and is not suitable for this product.
Garage installation: garages are not conditioned interior spaces. Temperature swings, vehicle exhaust humidity, and concrete floor moisture make garages incompatible with interior door products regardless of finish type.
Entry door replacement: SartoDoors interior doors must not be used as exterior entry doors. They have no weatherstripping rated for exterior exposure, no insulated core, and no structural rating for wind or impact loads.
Even within an interior installation, keep the following in mind:
Exterior-adjacent wall doors: if a door is mounted in a wall that faces the outside (e.g., a door to a cold basement stairwell, an unheated utility closet, or a door directly beside an exterior entry), condensation forms on the door surface in cold weather as warm interior air meets the cold wall. Wipe condensation promptly and ensure the wall is adequately insulated.
Direct sunlight through windows: UV radiation from windows that projects directly onto the door surface fades all finishes over time. Use window film, blinds, or shading to limit sustained direct sun exposure on door surfaces.
HVAC vents: avoid installing doors directly in the path of heating or cooling vents. Extreme localized temperature and humidity cycling causes finish cracking and dimensional instability in the door core.
08 Room-by-room guidance
Care requirements vary by room. The location determines which risks — moisture, grease, impact, UV — your door faces most often.
Bathrooms: the highest-risk environment
Steam from showers raises local humidity far above the 35–55% range — run an exhaust fan during and for 20 minutes after every shower.
Wipe condensation from door faces and edges after bathing, especially at the bottom edge.
Painted acrylic or eco-veneer finishes tolerate bathroom humidity better than wood veneer.
Wood veneer doors in bathrooms require strict humidity control and immediate drying after any moisture contact.
Never hang wet towels on the door — moisture wicks into edges and causes swelling.
Grease is the main kitchen challenge — it accumulates in a thin invisible film on door surfaces near ranges and can be mistaken for normal discoloration until it has built up significantly.
Clean kitchen-adjacent doors monthly with a diluted dish soap solution rather than just water — dish soap is specifically formulated to cut grease.
The back of a kitchen door (facing into the kitchen) accumulates far more grease than the hall-facing side. Do not neglect it.
Do not install wood veneer doors directly adjacent to a range without a ventilation hood above the range. Grease-laden steam discolors and penetrates veneer finishes.
Doors in children's spaces deal with crayon, marker, stickers, scuffs from toys and furniture, and the occasional projectile impact.
Eco-veneer doors are the recommended choice for children's rooms — they are the most damage-resistant and easiest to clean.
Crayon and most markers come off eco-veneer and enamel with a slightly damp cloth and a small amount of dish soap. Attack while fresh — dried crayon is harder to remove.
Sticker management: remove stickers as soon as possible. The longer the adhesive contacts the finish, the more residue it leaves. Use the oil method for stubborn residue.
Scuffs at handle height are the most common wear point in children's rooms. Consider a handle that minimizes push-plate contact, and wipe this area weekly.
Low-risk environments, but a few specific concerns apply.
Sunlight exposure: sustained direct sunlight fades all interior finishes over time. Wood veneer may lighten unevenly. Film-wrap adhesive can soften. Use window film or shading to limit direct UV exposure to doors.
Candles and incense: soot from candles deposits a very fine black film on door surfaces, especially around air currents and door gaps. Regular dry-dusting removes this before it becomes difficult.
HVAC vents: avoid mounting doors directly in the path of heating or cooling vents, which cause extreme localized humidity swings and temperature cycling.
09 Seasonal maintenance checklist
Even within an interior installation, keep the following in mind:
Season
What to Check and Do
Fall
Turn on humidifiers before heating season starts. Check door edges for any gap widening from summer expansion. Inspect veneer or paint edges for any lifting caused by summer humidity. Lubricate hinges before the heating season.
Winter
Monitor indoor humidity with a hygrometer – heating systems can drop humidity below 30%, which shrinks wood cores and cracks finishes. Watch for gap changes between door and frame. Wipe down doors near exterior entries where cold air creates condensation.
Spring
Transition from humidifier to dehumidifier as outdoor humidity rises. Check and tighten loose hinge screws after any winter settlement. Full clean of all door surfaces — grime builds up over winter from reduced ventilation.
Summer
Run dehumidifiers or A/C if indoor humidity exceeds 60%. Check bathroom and kitchen doors for any signs of swelling or finish lifting. Wipe eco-veneer door edges if any outdoor condensation has reached them.
10 Troubleshooting common issues
Most door problems develop gradually and are easier to address when caught early. Here are the most frequent issues and what to do.
Issue
Likely Cause
What to Do
White rings or haze on veneer
Moisture trapped under the coating
Apply a small amount of petroleum jelly, let sit 1 hour, buff gently with a soft cloth. For persistent hazing, consult a wood care professional.
Film edge lifting
Heat, moisture, or impact near the edge
Press edge back with finger. If un-bonded, use PVA glue under the edge. Do not pull.
Paint peeling at door base
Moisture wicking from floor through unsealed bottom edge
Stop the moisture source. Re-seal the base with a clear varnish or appropriate primer. Repaint when dry.
Door swelling and binding
Humidity too high, or water contact at bottom/edges
Reduce room humidity. If the door has swollen significantly, a minor plane of the hinge-side edge may be needed — consult your installer.
Surface scratches on veneer
Normal wear or abrasive contact
On oiled veneer: spot-oil the area. On UV-coated veneer: fine scratches may buff out with a very fine polishing compound (test first). Deep scratches may need professional touch-up.
Stain or discoloration on film
Chemical contact, solvent use, or prolonged sun exposure
If solvent-caused, the damage is permanent. Sun fade: uniformly re-film is the only correction. Stains: try diluted dish soap; if ineffective, the stain is within the film layer.
Crayon on acrylic paint
Direct contact with wax crayon
Plastic scraper for bulk. White non-gel toothpaste on a cloth for the remainder. Rinse, dry.
Swirl marks on gloss finish
Circular wiping motion or rough cloth
Buff gently with a clean lint-free microfiber using straight strokes. In severe cases, a fine auto-polish compound (test first) may reduce visibility.
Glass insert clouding at edges
Moisture seeping into glass-to-panel joint
Ensure the joint is dry. Re-seal with clear neutral-cure silicone if the factory seal has failed. Do not apply water or cleaner to the joint.
Black spots at mirror edges
Mirror rot — moisture reached silver backing
Mirror rot is irreversible. The glass panel requires replacement. Prevent by keeping edges dry and using ammonia-free cleaners.
Door rattles in frame
Hinge wear or strike plate misalignment
Adjust strike plate position. Replace worn hinge with matching hardware. Do not modify the door panel.
11 Warranty and support
SartoDoors limited warranty — care-related notes
The SartoDoors warranty covers manufacturing defects in materials and workmanship.
Damage resulting from improper cleaning, chemical exposure, moisture from improper installation, or failure to maintain appropriate indoor humidity is not covered.
Installing interior doors in bathrooms without adequate ventilation, or in exterior-adjacent locations, may void the warranty.
Primed doors shipped unfinished must be painted with acrylic paint on all six surfaces (including all four edges) before installation. Warranty claims arising from moisture damage on unfinished edges will not be accepted.
Keep your purchase documentation and order number. Some claims require proof of purchase and the specific product model.
When to call SartoDoors
Most care and maintenance issues described in this guide can be handled without professional assistance. Contact SartoDoors customer support when:
A finish defect appears within the first 12 months that is not related to cleaning or installation error — this may be a manufacturing claim.
You are unsure whether a problem is a warranty issue or normal wear.
You need a matching touch-up paint or film color reference for a specific door model.
You need guidance on whether a product or cleaner is safe for your specific door finish.
Quick reference
The SartoDoors warranty covers manufacturing defects in materials and workmanship.
Damage resulting from improper cleaning, chemical exposure, moisture from improper installation, or failure to maintain appropriate indoor humidity is not covered.
Installing interior doors in bathrooms without adequate ventilation, or in exterior-adjacent locations, may void the warranty.
Primed doors shipped unfinished must be painted with acrylic paint on all six surfaces (including all four edges) before installation. Warranty claims arising from moisture damage on unfinished edges will not be accepted.
Keep your purchase documentation and order number. Some claims require proof of purchase and the specific product model.
Safe for all SartoDoors finishes
Dry microfiber cloth — always safe, always first
Barely-damp microfiber with plain lukewarm water
Diluted mild dish soap (3-4 drops per cup of water)
pH-neutral wood cleaner diluted to 1/4 strength (veneer only)
70% isopropyl alcohol, applied sparingly, blotted not rubbed (film only — test first)
Ammonia-free glass cleaner applied to cloth (never sprayed at the door) — for glass inserts only!
Do Not
Bleach, ammonia, or chlorine cleaners
Acetone, paint thinner, mineral spirits
All-purpose spray cleaners (Lysol, 409, Windex)
Silicone furniture polish (Pledge)
Abrasive sponges, steel wool, or scrub pads
Steam cleaners
Warranty
VDOM Doors warrants this interior door and its supplied hardware against manufacturing defects in materials and workmanship under normal indoor residential use, when installed per this guide. This summary is provided with the installation guide; the full Limited Warranty & Claims Policy governs all claims.
Routine cleaning
Delamination, warping beyond published tolerance, or finish defects not caused by installation, misuse, or environment.
Defective supplied hardware (hinges, lock body, handles) that fails under normal operation.
Remedy #1 is a repair/adjustment visit or replacement parts; full-leaf replacement is reserved for defects that cannot be repaired.
What is not covered
Damage from improper installation (out-of-square frame, wrong rough opening, missing shims), field modification, or non-supplied hardware.
Moisture damage, swelling, or finish failure from exterior use, wet rooms, carpet fouling, or standing water.
Normal wear, site damage after delivery, and cosmetic issues reported after installation without contemporaneous photos.
Glass breakage unless a manufacturing defect is found (photograph any glass issue on receipt).
Try this before you file
Most "defect" reports are alignment issues that the reveal/hinge and strike adjustments in Sections 04–06 resolve in minutes. Re-square the frame and re-check the hinge screws first — then contact VDOM Doors with photos and your order number if the issue remains.
Warranty term2 yearsfrom date of delivery to original purchaser
CoverageALL SARTODOORS INTERIOR DOOR PRODUCTS AND INCLUDED HARDWAREregardless of purchase channel
01Warranty coverage and term
SartoDoors is a product brand owned and operated by VDOM INC. This limited warranty is issued directly by VDOM INC. as the manufacturer of all SartoDoors interior door products. It applies to every customer who purchases a SartoDoors door — whether through United Porte Inc., Amazon, Home Depot, or any authorized dealer — and covers the same scope regardless of the sales channel. No retailer or reseller can change, expand, or reduce the terms of this warranty on behalf of VDOM INC.
SartoDoors interior doors are designed, engineered, and finished in Europe. They are warranted to be free from defects in materials and workmanship under normal residential indoor use for a period of two (2) years from the date of delivery to the original purchaser.
Term
Two (2) years
Start
Date of delivery, per shipping or delivery confirmation
End
Twenty-four (24) months from the Start date
Who Is Covered
Original purchaser at the original installation address only. Non-transferable.
Where Purchased
Coverage is identical whether purchased directly, via Amazon, Home Depot, or any authorized dealer.
Most SartoDoors interior doors are sold as a complete pre-hung kit ready for installation. All components listed below are covered under this warranty when supplied by SartoDoors as part of the original order:
Component
Details
Door slab
1 1/2 – 1 3/4 in. thick; finish varies by model: eco-veneer (film), acrylic paint, high-gloss lacquer, or wood veneer.
Door frame — jamb set
Split-jamb or standard jamb, sized to the ordered wall thickness.
Casing — trim profiles
Decorative surround for both faces of the opening, finished to match the door.
Hinges
2–4 pcs per leaf; European-standard concealed or surface-mounted depending on model.
Handle set
European lever handle, passage or privacy function, in the finish selected at order.
Latch or lock
Passage latch (no locking), privacy lock (interior turn-button), or keyed lock as ordered.
Strike plate
Supplied loose or factory-installed on the jamb.
Fastening hardware
Screws and bolts required for handle and hinge installation.
Slab-only orders and specialty configurations
Slab-only: warranty covers the door panel and its finish only. Frame, casing, and hardware are not included and not covered.
French door sets: each leaf is covered individually under the same terms; the pair is treated as two door units.
Pocket doors: warranty covers the slab and all supplied track hardware. The pocket rough-in frame is covered only if supplied by SartoDoors.
Barn doors: warranty covers the slab and the supplied rail and hanger set.
Bifold and bypass closet doors: all slabs and track hardware in the kit are covered.
Hidden doors: the slab, hidden frame system, magnetic latch, and concealed hinge mechanism are all covered.
02What is covered
SartoDoors stands behind the quality of its products. The following defects are covered when they appear under normal residential use within the Warranty Period.
Warping or twisting of the door panel exceeding 3/16 in. (5 mm) measured diagonally, under normal indoor humidity (35–65% RH) within 24 months of delivery
Lifting or delamination of the eco-veneer surface from the substrate, in areas not exposed to localized heat sources (hair dryers, flat irons, steam).
Peeling, cracking, or loss of adhesion in the factory-applied acrylic finish, where the damage is not attributable to impact, chemical exposure, or abrasive cleaning.
High-gloss lacquer finish: visible bubbling, crazing, or delamination that originates in the factory application and is not the result of solvent contact or impact.
Wood veneer delamination, where the door was used in a properly ventilated interior environment with relative humidity maintained within the rated range.
Manufacturing defects in glass inserts (frosted, clear, or opaque): bubbles, inclusions, distortion, or visible imperfections not present at delivery.
Failure of the factory-applied sealant between a glass insert and the surrounding door panel, appearing within 12 months of delivery and not caused by liquid contact at the joint.
Structural failure or splitting of the door frame (jamb) under normal residential conditions.
Finish delamination or peeling of casing and trim profiles, consistent with the finish defects described in Section 2.1.
Dimensional errors in the frame components that prevent correct assembly per the supplied instructions.
Handle set: lever or knob that becomes stiff, loose, or detached under normal use; finish peeling within the warranty period.
Latch mechanism: failure to retract or engage under normal hand pressure.
Hinges: failure or visible deformation under the rated door weight and normal residential traffic.
Privacy lock cylinder or turn-button: failure under normal key operation or normal interior use.
Barn door hardware: failure of roller, hanger, or track causing the door to derail or cease sliding, where the door weight is within the rated capacity of the hardware.
Pocket door track: failure preventing smooth operation, where the cause is not building settlement or an obstruction within the wall cavity.
Bifold / bypass hardware: mechanism failure causing the door to bind or jump the track under normal use.
Concealed hinge mechanism: failure of the concealed hinge, pivot mechanism, or magnetic latch under normal residential use.
03What is not covered
The following situations and damage types fall outside the scope of this warranty. SartoDoors has written these exclusions to be straightforward — they apply when the product is not at fault.
Interior use only — no exceptions: SartoDoors interior doors are designed and tested for use inside conditioned living spaces. Installing these doors in a garage, unheated outbuilding, unconditioned basement, or any exterior-facing position will cause irreversible damage and voids all warranty coverage. These doors are not weatherproofed, not UVstabilized for outdoor exposure, and not structurally rated for exterior wind or impact loads.
Humidity outside the rated range: warping, swelling, shrinking, or finish cracking caused by sustained indoor humidity above 70% or below 20%. SartoDoors doors are rated for 35–65% RH. A bathroom without exhaust ventilation, or a home with no humidification in a dry winter, does not provide the required operating environment. A basic hygrometer is an inexpensive tool for verifying your indoor conditions.
Direct heat sources: finish damage from hair dryers, flat irons, countertop appliances, or sustained direct sunlight through windows onto the door face. The eco-veneer and high-gloss lacquer finishes are sensitive to temperatures above 140°F (60°C).
Water at the glass-to-panel joint: this is the most common preventable claim situation for glazed SartoDoors doors. The joint between any glass insert and the surrounding MDF panel is the most moisture-sensitive point on the door. Cleaning solution, water spray, or condensation that enters this joint will reach the MDF core and cause irreversible swelling that pushes the panel face outward around the glass. This is not repairable and is not a manufacturing defect. Always apply cleaning liquids to a cloth first, and wipe outward from the center of the glass toward — but not into — the joint.
SartoDoors pre-hung kits ship disassembled. The frame and casing require on-site assembly per the supplied instructions. Damage resulting from assembly errors is not covered, including:
Door panel binding caused by a frame that was not checked for plumb, level, and square before fastening.
Hinge pull-through caused by using screws that are too short for the hinge leaf depth, or by stripping screws during installation.
Panel surface damage caused by the door rubbing against the jamb due to uneven shimming.
Latch misalignment caused by strike plate installed without adjusting for door reveal.
Handle bore area damage caused by re-drilling or widening the pre-cut bore in the factory slab.
If your door was installed by a professional and an alignment or fit problem develops, contact us before submitting a formal claim. Many fit issues resolve in minutes with a hinge adjustment or strike plate move, with no parts required.
Physical impact: chips, scratches, cracks, or dents from contact with furniture, door hardware, pets, tools, or any external object. SartoDoors doors are not impact-rated.
Improper cleaning: surface damage from ammonia, bleach, acetone, all-purpose spray cleaners, Magic Eraser on matte or satin finishes, or steam cleaners. The SartoDoors Interior Door Care Guide lists approved cleaning products.
Unauthorized changes: drilling, cutting, painting, or hardware replacement not performed according to the door manufacturer's instructions. Applying adhesive films, decals, or tint to glass inserts voids glass coverage.
Normal wear: scuffs at door-handle height from normal daily use, gradual sheen change in high-traffic areas over time, and minor hardware finish wear are expected and are not defects.
Third-party hardware: handles, hinges, tracks, or latches not supplied by SartoDoors as part of the original order.
Slab-only doors not painted on all edges: primed slabs installed without sealing all six surfaces — including the top edge, bottom edge, hinge edge, and lock edge — with finish-grade acrylic paint before installation are excluded from moisture-related coverage.
Touch-up painting: brush-applied touch-up paint will not match a factory spray finish in sheen or surface texture. This is a known limitation of brush application, not a product defect.
Accessories purchased separately: additional handles, hinges, locks, or tracks bought outside the original kit order carry a 2-year warranty from their individual delivery date.
04Installation and assembly
SartoDoors pre-hung door kits arrive in separate packages: the door slab, frame components, casing profiles, and a hardware package. The frame requires on-site assembly and installation. No specialized certification is required for warranty coverage. United Porte Inc. offers professional installation in selected US markets — contact sales@sartodoors.com to check availability.
Key steps that prevent the most common issues
For primed-only slabs: apply two coats of acrylic paint to all six surfaces — slab faces, top edge, bottom edge, hinge edge, and lock edge — before installation. The bottom edge in particular is exposed to floor moisture and must be sealed.
Keep this door in a conditioned interior space from the day it arrives. Do not stage it in an unheated garage or damp basement — even a few days of improper storage can cause the panel to absorb moisture.
Do not install SartoDoors doors in garages, mudrooms open to the exterior, unheated spaces, or any room where outdoor air, rain, or frost can reach the door.
05How to submit a warranty claim
All claims must be submitted in writing using the Claim Form in Appendix B. Informal reports by phone call, text, or social media are not formal claim submissions and will not be tracked in our warranty system.
A surprising number of reported issues can be fully resolved in a short phone or email conversation, with no parts and no formal claim. Please reach out first:
The door is binding or not closing fully: this is almost always a hinge or strike plate adjustment, not a defect. Our support team can walk you through it in minutes.
The handle feels stiff or the latch doesn't engage cleanly: typically a strike plate position issue. Resolved on-site in under 10 minutes.
There is a small gap at the top corner of the door: hinge adjustment. No parts needed
A surface mark won't wipe off: check the SartoDoors Care Guide first — the right method often removes marks that seem permanent.
If in doubt, email a photo to sales@sartodoors.com with your order number. We will tell you within 48 hours whether it is a warranty issue, a quick fix, or a care guide situation.
Email the completed Claim Form (Appendix B) to sales@sartodoors.com with subject: WARRANTY CLAIM – [Your Order Number].
Acknowledgment within 48 business hours of receiving your complete submission.
Review our team evaluates documentation and photographs. Most claims are assessed within 5–10 business days.
Written determination approval, partial approval, or denial with the basis explained clearly.
Resolution see Section 6 for remedy options and what to expect next.
Completed Claim Form (Appendix B) with all fields filled.
Proof of purchase: order number, invoice, or purchase confirmation.
Proof of delivery date: shipping confirmation or delivery receipt.
Photographs: at minimum, four clear images — (a) the full door from one side, (b) the full door from the opposite side, (c) a close-up of the specific problem, (d) the wider context of the problem area showing surrounding panel or frame.
For handle or latch claims: a short video (15–30 seconds) showing the mechanism behavior is significantly more useful than photos.
For glass-related claims: photos taken as soon as the issue was discovered. If the glass cracked suddenly, describe the circumstances in detail on the Claim Form.
Assembly documentation (if available): completed Checklist (Appendix A) or the name of your installer
06Claim evaluation, remedies, and timeline
Every SartoDoors warranty claim is evaluated against the same criteria and the same terms. The outcome is determined by the documentation and the facts — not by negotiation or relationship. Our goal is to acknowledge every claim within 48 hours and resolve it as efficiently as the situation allows.
When a claim is approved, SartoDoors will choose the most appropriate remedy from the following options. The selection is at SartoDoors' sole discretion based on what will most effectively resolve the issue:
Repair visit — a SartoDoors or United Porte technician comes to your home to assess and, where possible, fix the issue on the spot. A Repair Visit is offered first whenever there is a reasonable chance it will resolve the problem. On-site resolution is faster for everyone. Typical outcomes from a Repair Visit: hinge adjustment correcting a binding or sagging door, strike plate repositioning for a latch that won’t catch, handle re-seating or tightening, latch lubrication, minor surface touch-up. Available in markets where United Porte operates; contact us to confirm coverage for your area.
Parts replacement — SartoDoors provides replacement components: handle set, latch, hinge, section of casing, glass insert, or door panel section. Standard in-stock parts ship within 2–4 weeks of claim approval. The customer is responsible for installation of replacement parts unless a Repair Visit is arranged alongside the parts delivery.
Door replacement — when a defect cannot be repaired and no replacement part can resolve it, SartoDoors replaces the complete door unit with one of equal or superior specification. The replacement unit carries the remaining term of the original warranty, or a minimum of 90 days from delivery, whichever is longer.
How a repair visit works
A Repair Visit is covered under warranty at no charge to you when the claim is approved. Scheduling: a SartoDoors or United Porte representative will contact you within 5 business days of claim approval to schedule a convenient time. What a Repair Visit typically resolves: door binding (hinge adjustment), latch not catching (strike plate), handle loose or stiff, casing gap, minor surface mark touch-up. What requires parts before or after the visit: glass insert replacement, door panel replacement, full handle set swap. The Repair Visit will confirm the scope; parts are ordered immediately after
Step
Target Timeframe
Claim acknowledged
Within 48 business hours of complete submission
Evaluation and decision
Within 10 business days for standard cases
Repair Visit scheduled
Within 5 business days of approval (where United Porte operates)
In-stock replacement parts dispatched
Within 2–4 weeks of approval
Made-to-order parts from European factory
Up to 4 calendar months from approval
Full door replacement
Up to 4 calendar months, subject to model and production schedule
A note on the 4-month timeframe
SartoDoors doors are made to order in Europe. Replacement panels, glass inserts, and complete doors in specific finishes, sizes, or configurations are not warehoused domestically in large quantities. When your replacement needs to be manufactured and shipped from Europe, four months is an honest and realistic estimate. SartoDoors will give you a written delivery date estimate within 5 business days of approval and will update you promptly if that date changes. We do not consider a claim closed until your remedy is in your hands and the issue is resolved.
07Limitation of liability
TO THE MAXIMUM EXTENT ALLOWED BY APPLICABLE LAW, THE REMEDIES IN SECTION 6 ARE YOUR SOLE AND EXCLUSIVE REMEDY UNDER THIS WARRANTY. SARTODOORS AND VDOM INC. SHALL NOT BE LIABLE FOR:
Any incidental, consequential, indirect, special, or punitive damages — including loss of use, property damage to adjoining surfaces, or any other loss arising from the failure of a SartoDoors product — even if SartoDoors was made aware of the possibility of such damages.
The cost of removing or reinstalling flooring, wall finishes, paint, or other materials that must be disturbed to perform warranty repair.
Delays in delivery of replacement components caused by international manufacturing and shipping lead times as described in Section 6.3.
Some states do not permit exclusion or limitation of incidental or consequential damages, or restrictions on the duration of implied warranties. These limitations may not apply to you in full. This warranty gives you specific legal rights; you may also have other rights that vary by state.
08Governing law and dispute resolution
This warranty is governed by the laws of the State of New York, without regard to conflict of law rules. Any dispute arising from this warranty that the parties cannot resolve through direct communication will be submitted to binding arbitration before the American Arbitration Association (AAA) under its Consumer Arbitration Rules, in Richmond County, New York. The arbitrator's decision is final and binding on both parties. Either party may separately seek injunctive or equitable relief from a court of competent jurisdiction where necessary to prevent irreparable harm. Nothing in this warranty limits any rights you may have under applicable consumer protection law.
Complete this checklist during installation and keep a copy. If you submit a warranty claim involving a fit, alignment, or performance issue, this record helps us evaluate it and speeds up resolution.
Fill out this form if you need to file a warranty claim. Complete every field, attach photographs and video where indicated, and email your submission to sales@sartodoors.com with the subject line: WARRANTY CLAIM – [Order Number]. Incomplete submissions will be returned.
FAQ
Check your packing slip or sales confirmation. A = standard butt hinges + American mortise lock; B = concealed hinges + American lock; C = Euro handle + magnetic mortise lock. Steps 3–5 and Section 05 differ by configuration.
The bevel faces the direction the door closes (toward the strike). To reverse it, push the latch in with a screwdriver, rotate 180°, and release — no need to remove the lock body.
Order the Frame (Jamb) Extension add-on (4" or 8" width) rather than a custom jamb — see Section 06. It tongues into the existing jamb groove and carries the casing on its outer edge.
These doors are built for hard/finished flooring. Set the floor gap Y from the top of finished carpet, or trim the carpet back under the door — deep pile fouls the bottom gap and prevents closing.
Re-check the frame diagonals and that the hinge-side jamb is fastened flat. On concealed hinges, use the 3-way adjustment. Most binding is a frame-square or hinge-screw issue, not a defective leaf.
A dry PTFE or graphite lubricant. Avoid oil or grease — they attract dust and gum up the mechanism over time.
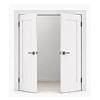
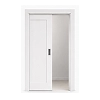
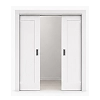
Choose your door type
Select the door type to access the complete installation guide